> ## Documentation Index
> Fetch the complete documentation index at: https://encrova-docs.platform.ai71services.ai/llms.txt
> Use this file to discover all available pages before exploring further.
# Private CA
> Learn how to create a Private CA hierarchy with Encrova.
## Concept
The first step to creating your Internal PKI is to create a Private Certificate Authority (CA) hierarchy that is a structure of entities
used to issue digital certificates for services, applications, and devices.
```mermaid
graph TD
A[Root CA]
A --> B[Intermediate CA]
A --> C[Intermediate CA]
```
## Workflow
A typical workflow for setting up a Private CA hierarchy consists of the following steps:
1. Configuring an Encrova root CA with details like name, validity period, and path length — This step is optional if you wish to use an external root CA.
2. Configuring and chaining intermediate CA(s) with details like name, validity period, path length, and imported certificate to your Root CA.
3. Managing the CA lifecycle events such as CA succession.
Note that this workflow can be executed via the Encrova UI or manually such
as via API. If manually executing the workflow, you may have to create a
Certificate Signing Request (CSR) for the intermediate CA, create an
intermediate certificate using the root CA private key and CSR, and import the
intermediate certificate back to the intermediate CA as part of Step 2.
## Guide to Creating a CA Hierarchy
In the following steps, we explore how to create a simple Private CA hierarchy
consisting of an (optional) root CA and an intermediate CA.
If you wish to use an external root CA, you can skip this step and head to step 2 to create an intermediate CA.
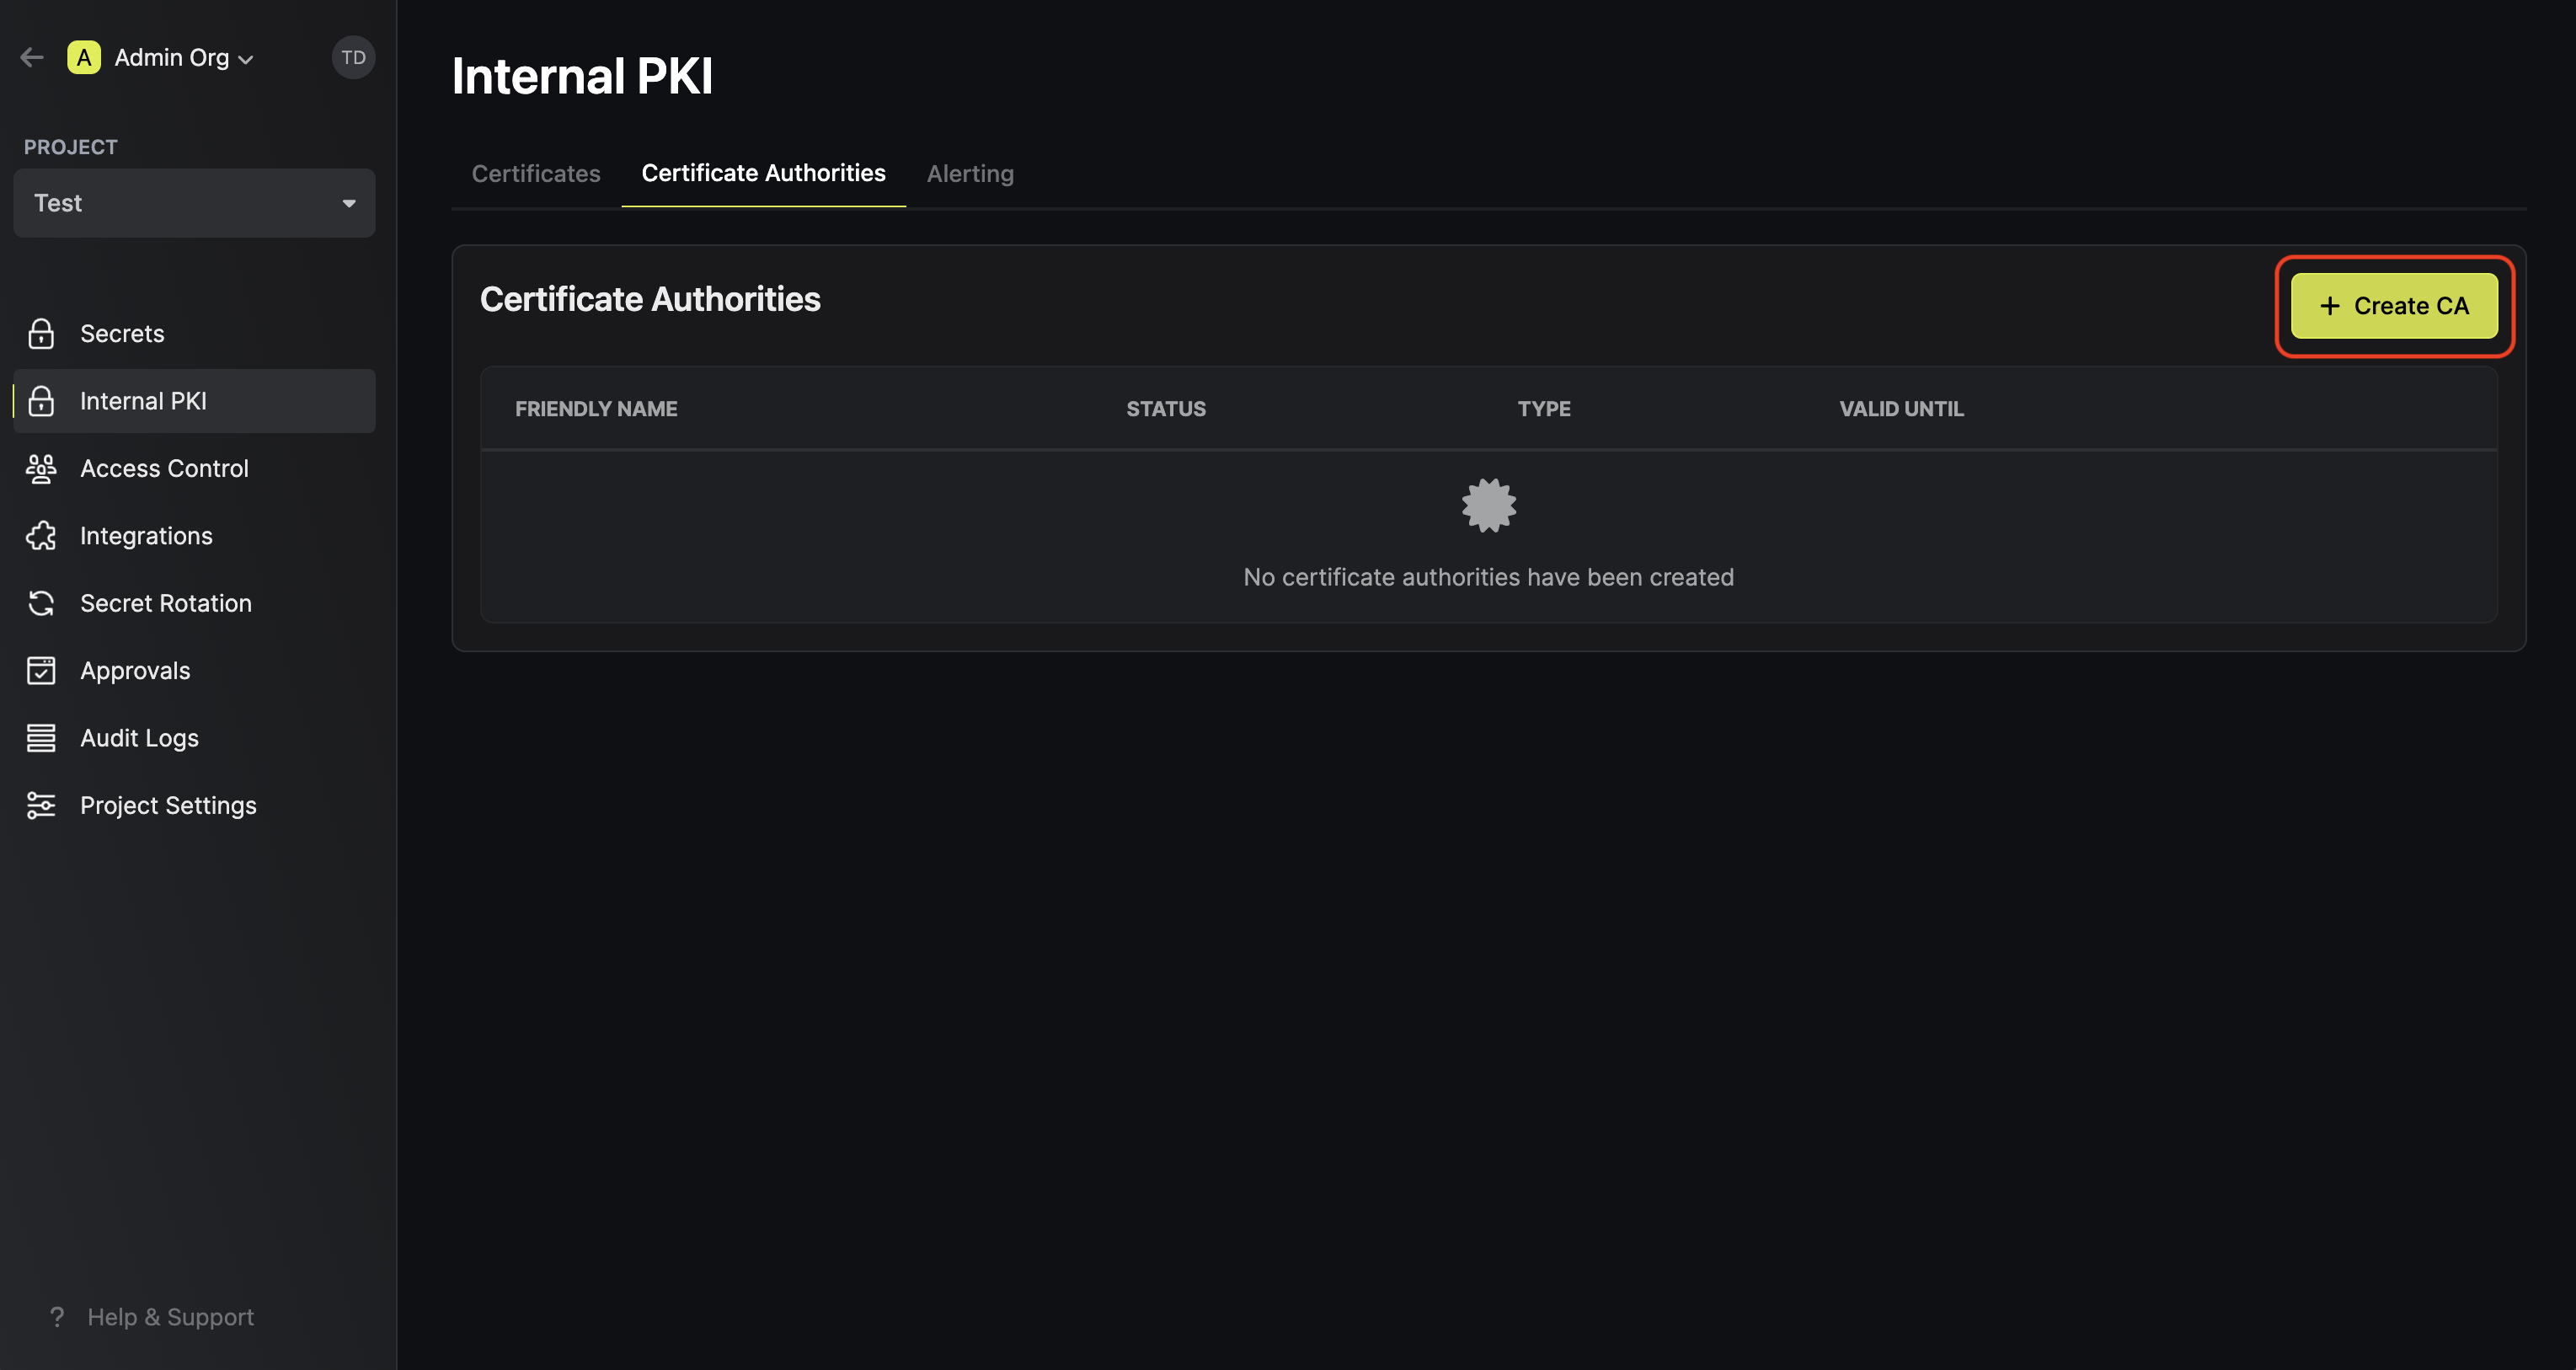
To create a root CA, head to your Project > Internal PKI > Certificate Authorities and press **Create CA**.
 Here, set the **CA Type** to **Root** and fill out details for the root CA.
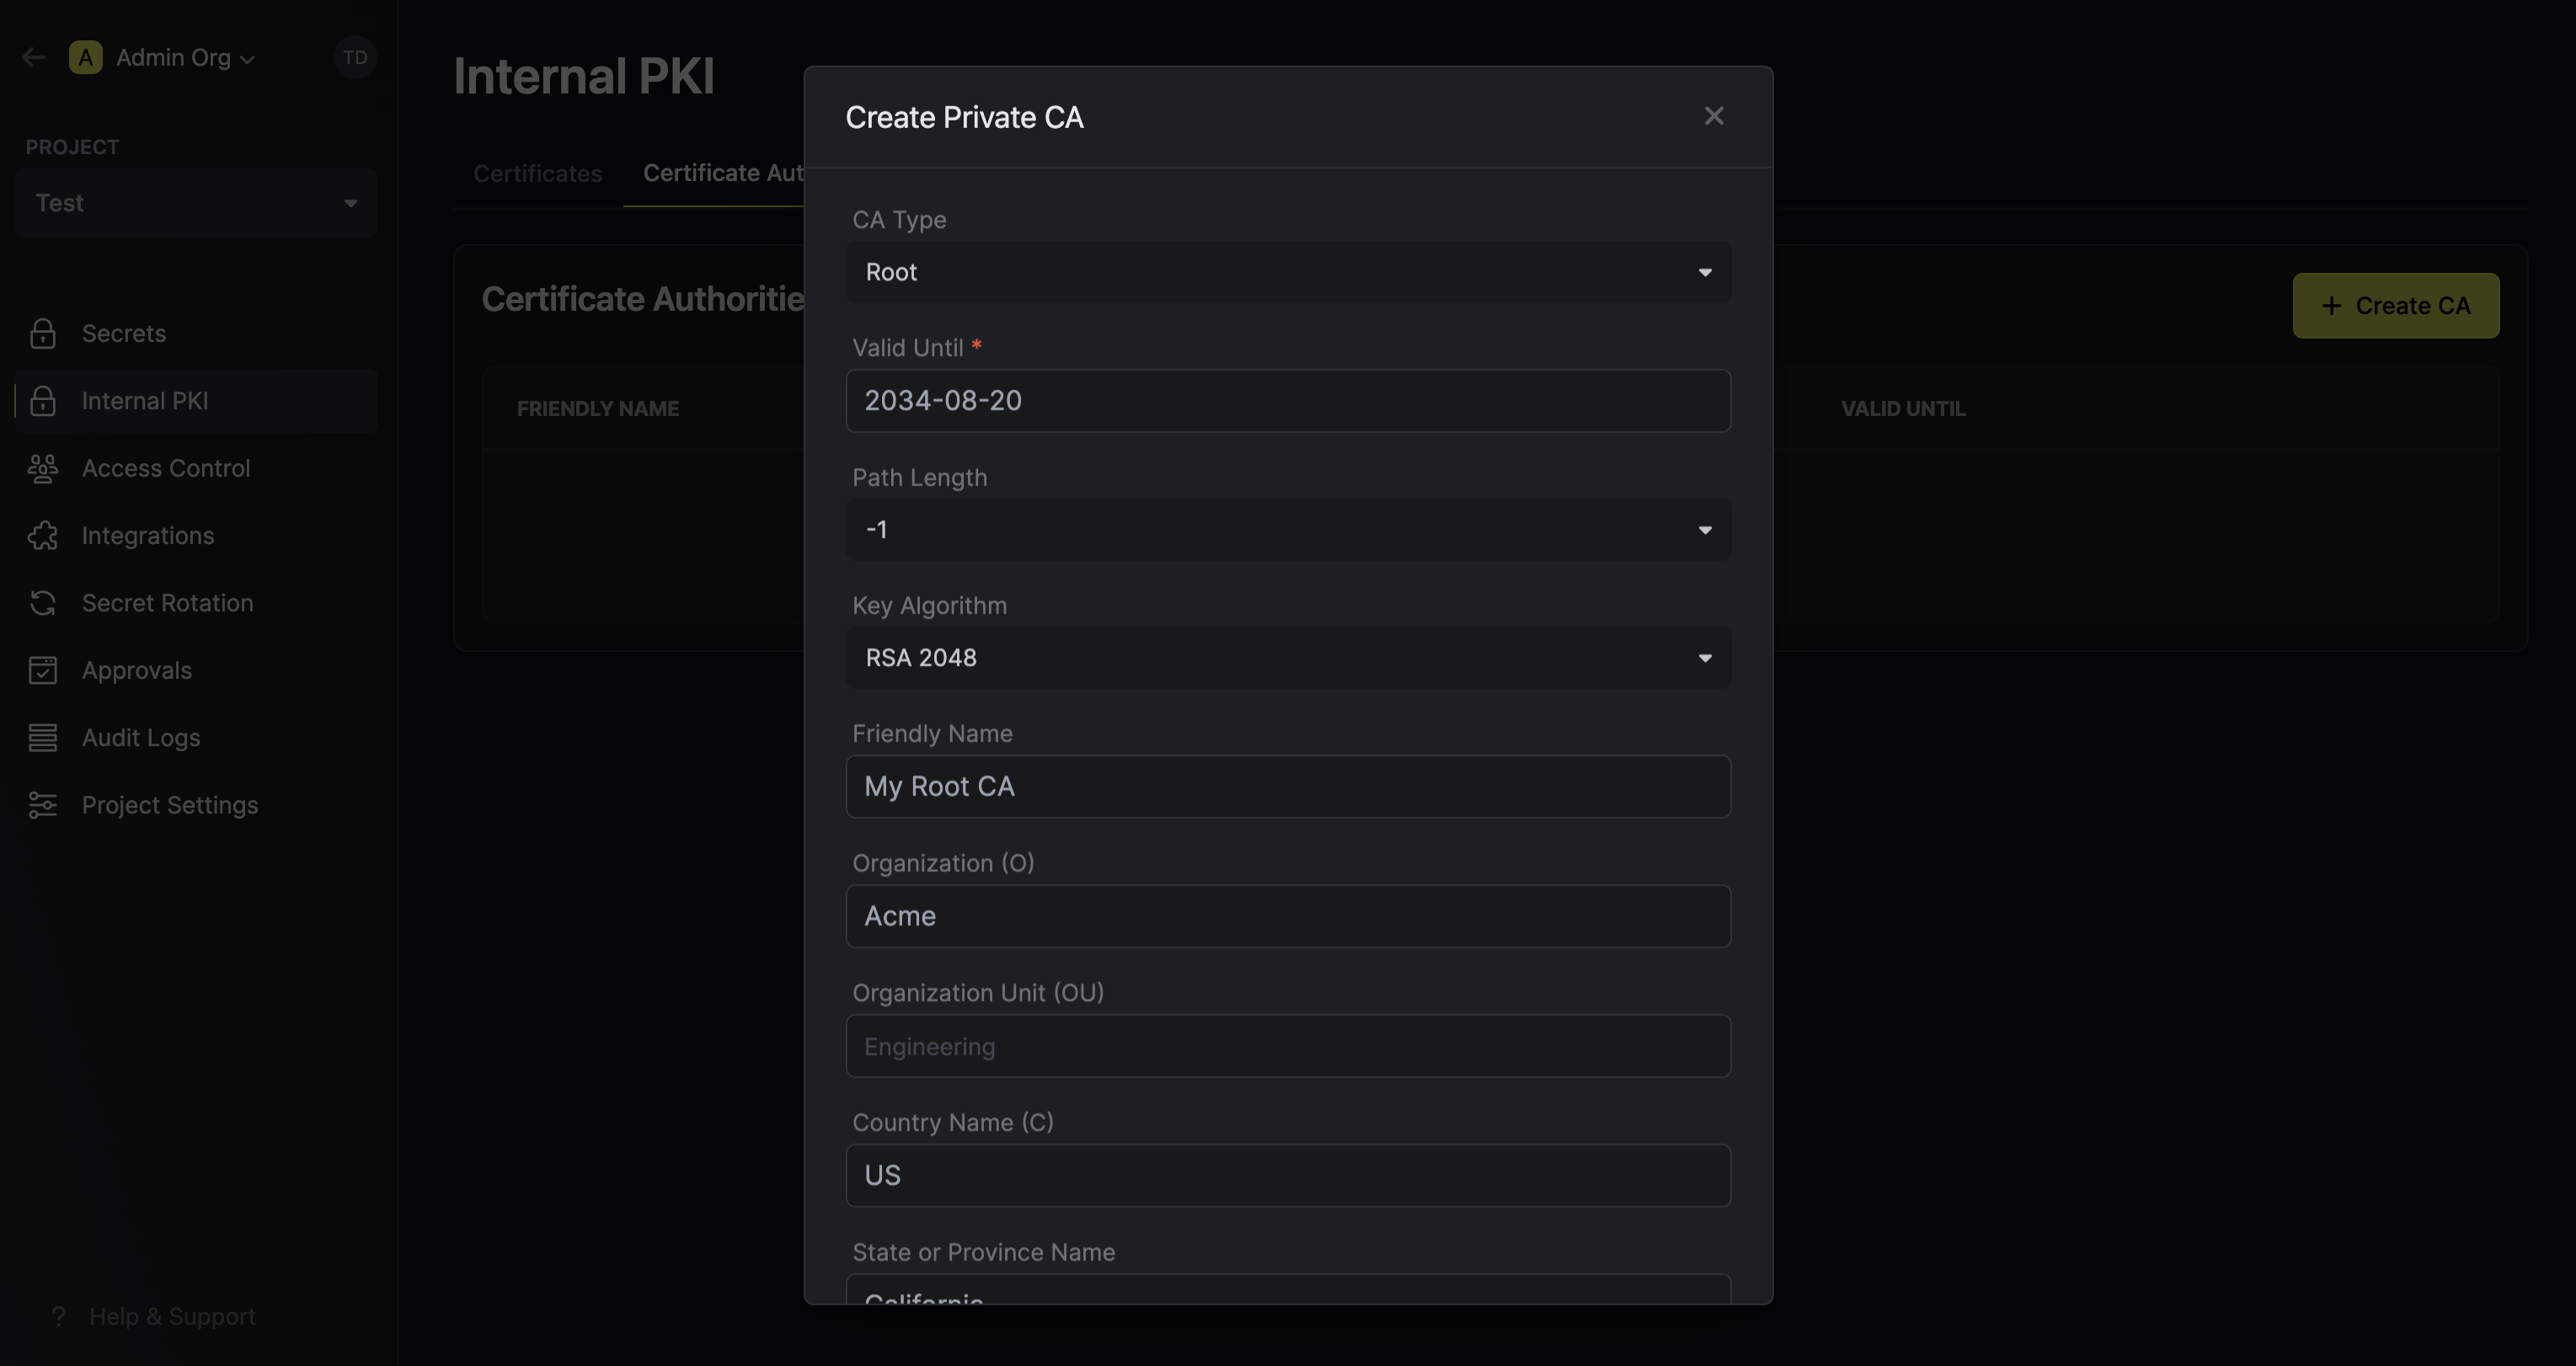 Here's some guidance on each field:
* Valid Until: The date until which the CA is valid in the date time string format specified [here](https://developer.mozilla.org/en-US/docs/Web/JavaScript/Reference/Global_Objects/Date#date_time_string_format). For example, the following formats would be valid: `YYYY`, `YYYY-MM`, `YYYY-MM-DD`, `YYYY-MM-DDTHH:mm:ss.sssZ`.
* Path Length: The maximum number of intermediate CAs that can be chained to this CA. A path of `-1` implies no limit; a path of `0` implies no intermediate CAs can be chained.
* Key Algorithm: The type of public key algorithm and size, in bits, of the key pair that the CA creates when it issues a certificate. Supported key algorithms are `RSA 2048`, `RSA 4096`, `ECDSA P-256`, and `ECDSA P-384` with the default being `RSA 2048`.
* Friendly Name: A friendly name for the CA; this is only for display and defaults to the subject of the CA if left empty.
* Organization (O): The organization name.
* Country (C): The country code.
* State or Province Name: The state or province.
* Locality Name: The city or locality.
* Common Name: The name of the CA.
* Require Template for Certificate Issuance: Whether or not certificates for this CA can only be issued through certificate templates (recommended).
The Organization, Country, State or Province Name, Locality Name, and Common Name make up the **Distinguished Name (DN)** or **subject** of the CA.
At least one of these fields must be filled out.
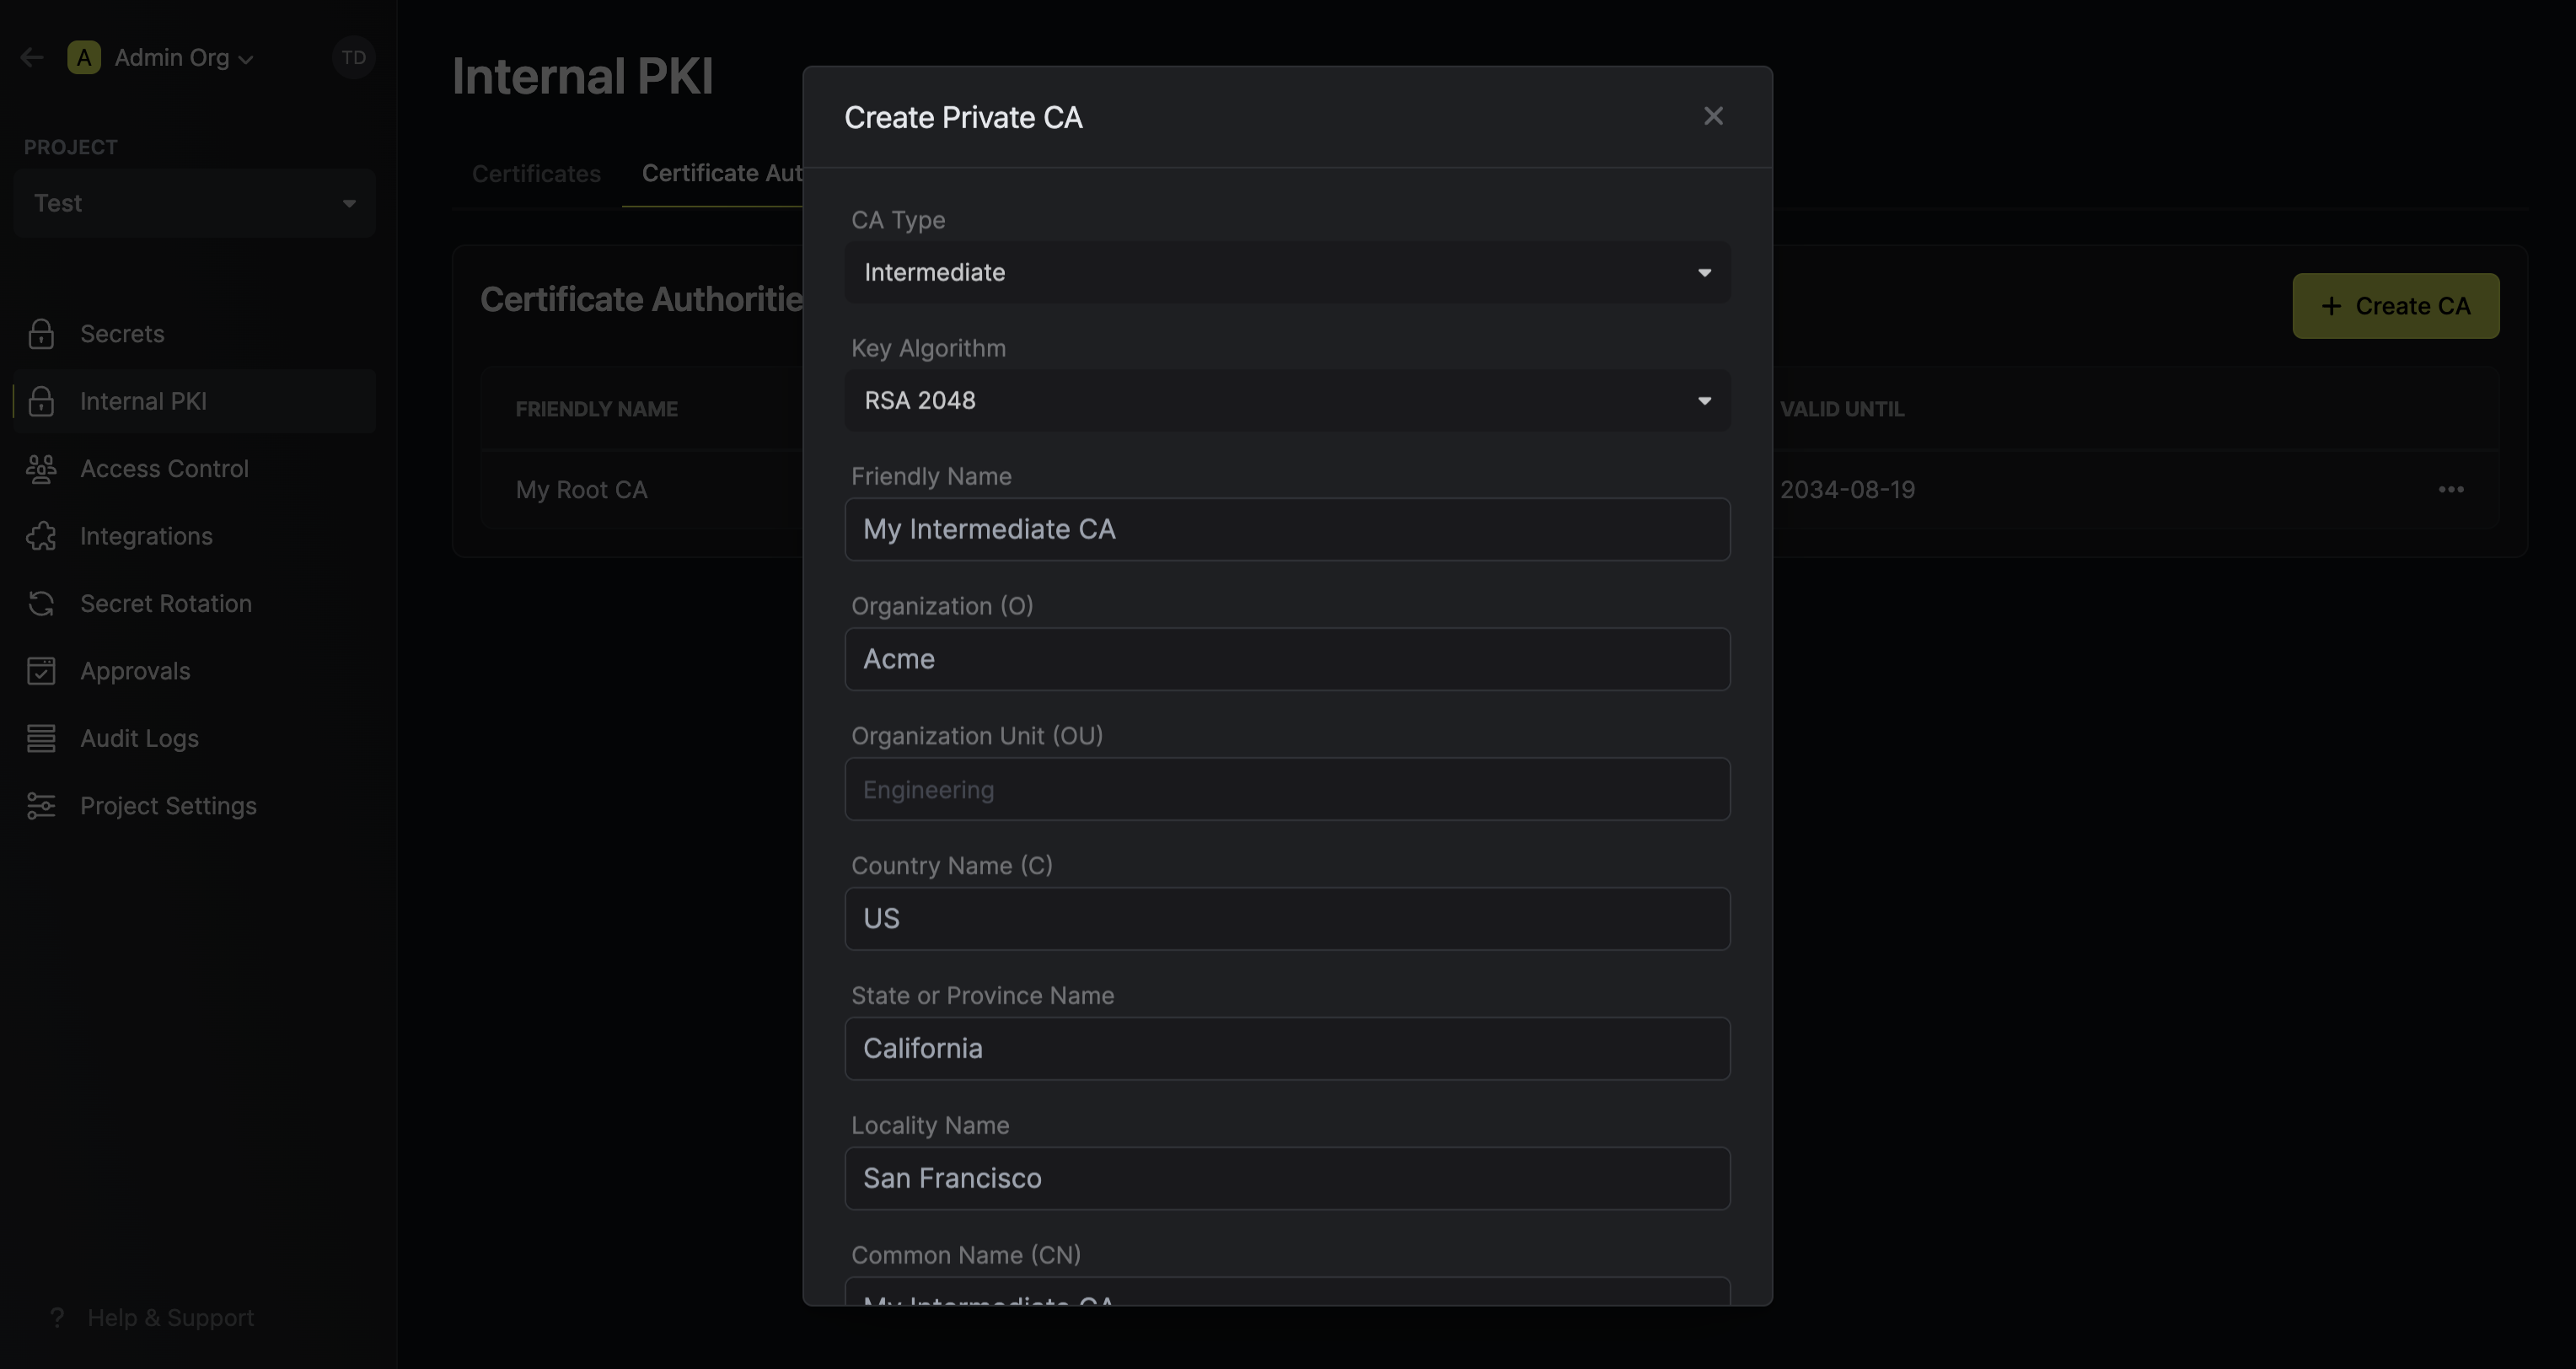
2.1. To create an intermediate CA, press **Create CA** again but this time specifying the **CA Type** to be **Intermediate**. Fill out the details for the intermediate CA.
Here's some guidance on each field:
* Valid Until: The date until which the CA is valid in the date time string format specified [here](https://developer.mozilla.org/en-US/docs/Web/JavaScript/Reference/Global_Objects/Date#date_time_string_format). For example, the following formats would be valid: `YYYY`, `YYYY-MM`, `YYYY-MM-DD`, `YYYY-MM-DDTHH:mm:ss.sssZ`.
* Path Length: The maximum number of intermediate CAs that can be chained to this CA. A path of `-1` implies no limit; a path of `0` implies no intermediate CAs can be chained.
* Key Algorithm: The type of public key algorithm and size, in bits, of the key pair that the CA creates when it issues a certificate. Supported key algorithms are `RSA 2048`, `RSA 4096`, `ECDSA P-256`, and `ECDSA P-384` with the default being `RSA 2048`.
* Friendly Name: A friendly name for the CA; this is only for display and defaults to the subject of the CA if left empty.
* Organization (O): The organization name.
* Country (C): The country code.
* State or Province Name: The state or province.
* Locality Name: The city or locality.
* Common Name: The name of the CA.
* Require Template for Certificate Issuance: Whether or not certificates for this CA can only be issued through certificate templates (recommended).
The Organization, Country, State or Province Name, Locality Name, and Common Name make up the **Distinguished Name (DN)** or **subject** of the CA.
At least one of these fields must be filled out.
2.1. To create an intermediate CA, press **Create CA** again but this time specifying the **CA Type** to be **Intermediate**. Fill out the details for the intermediate CA.
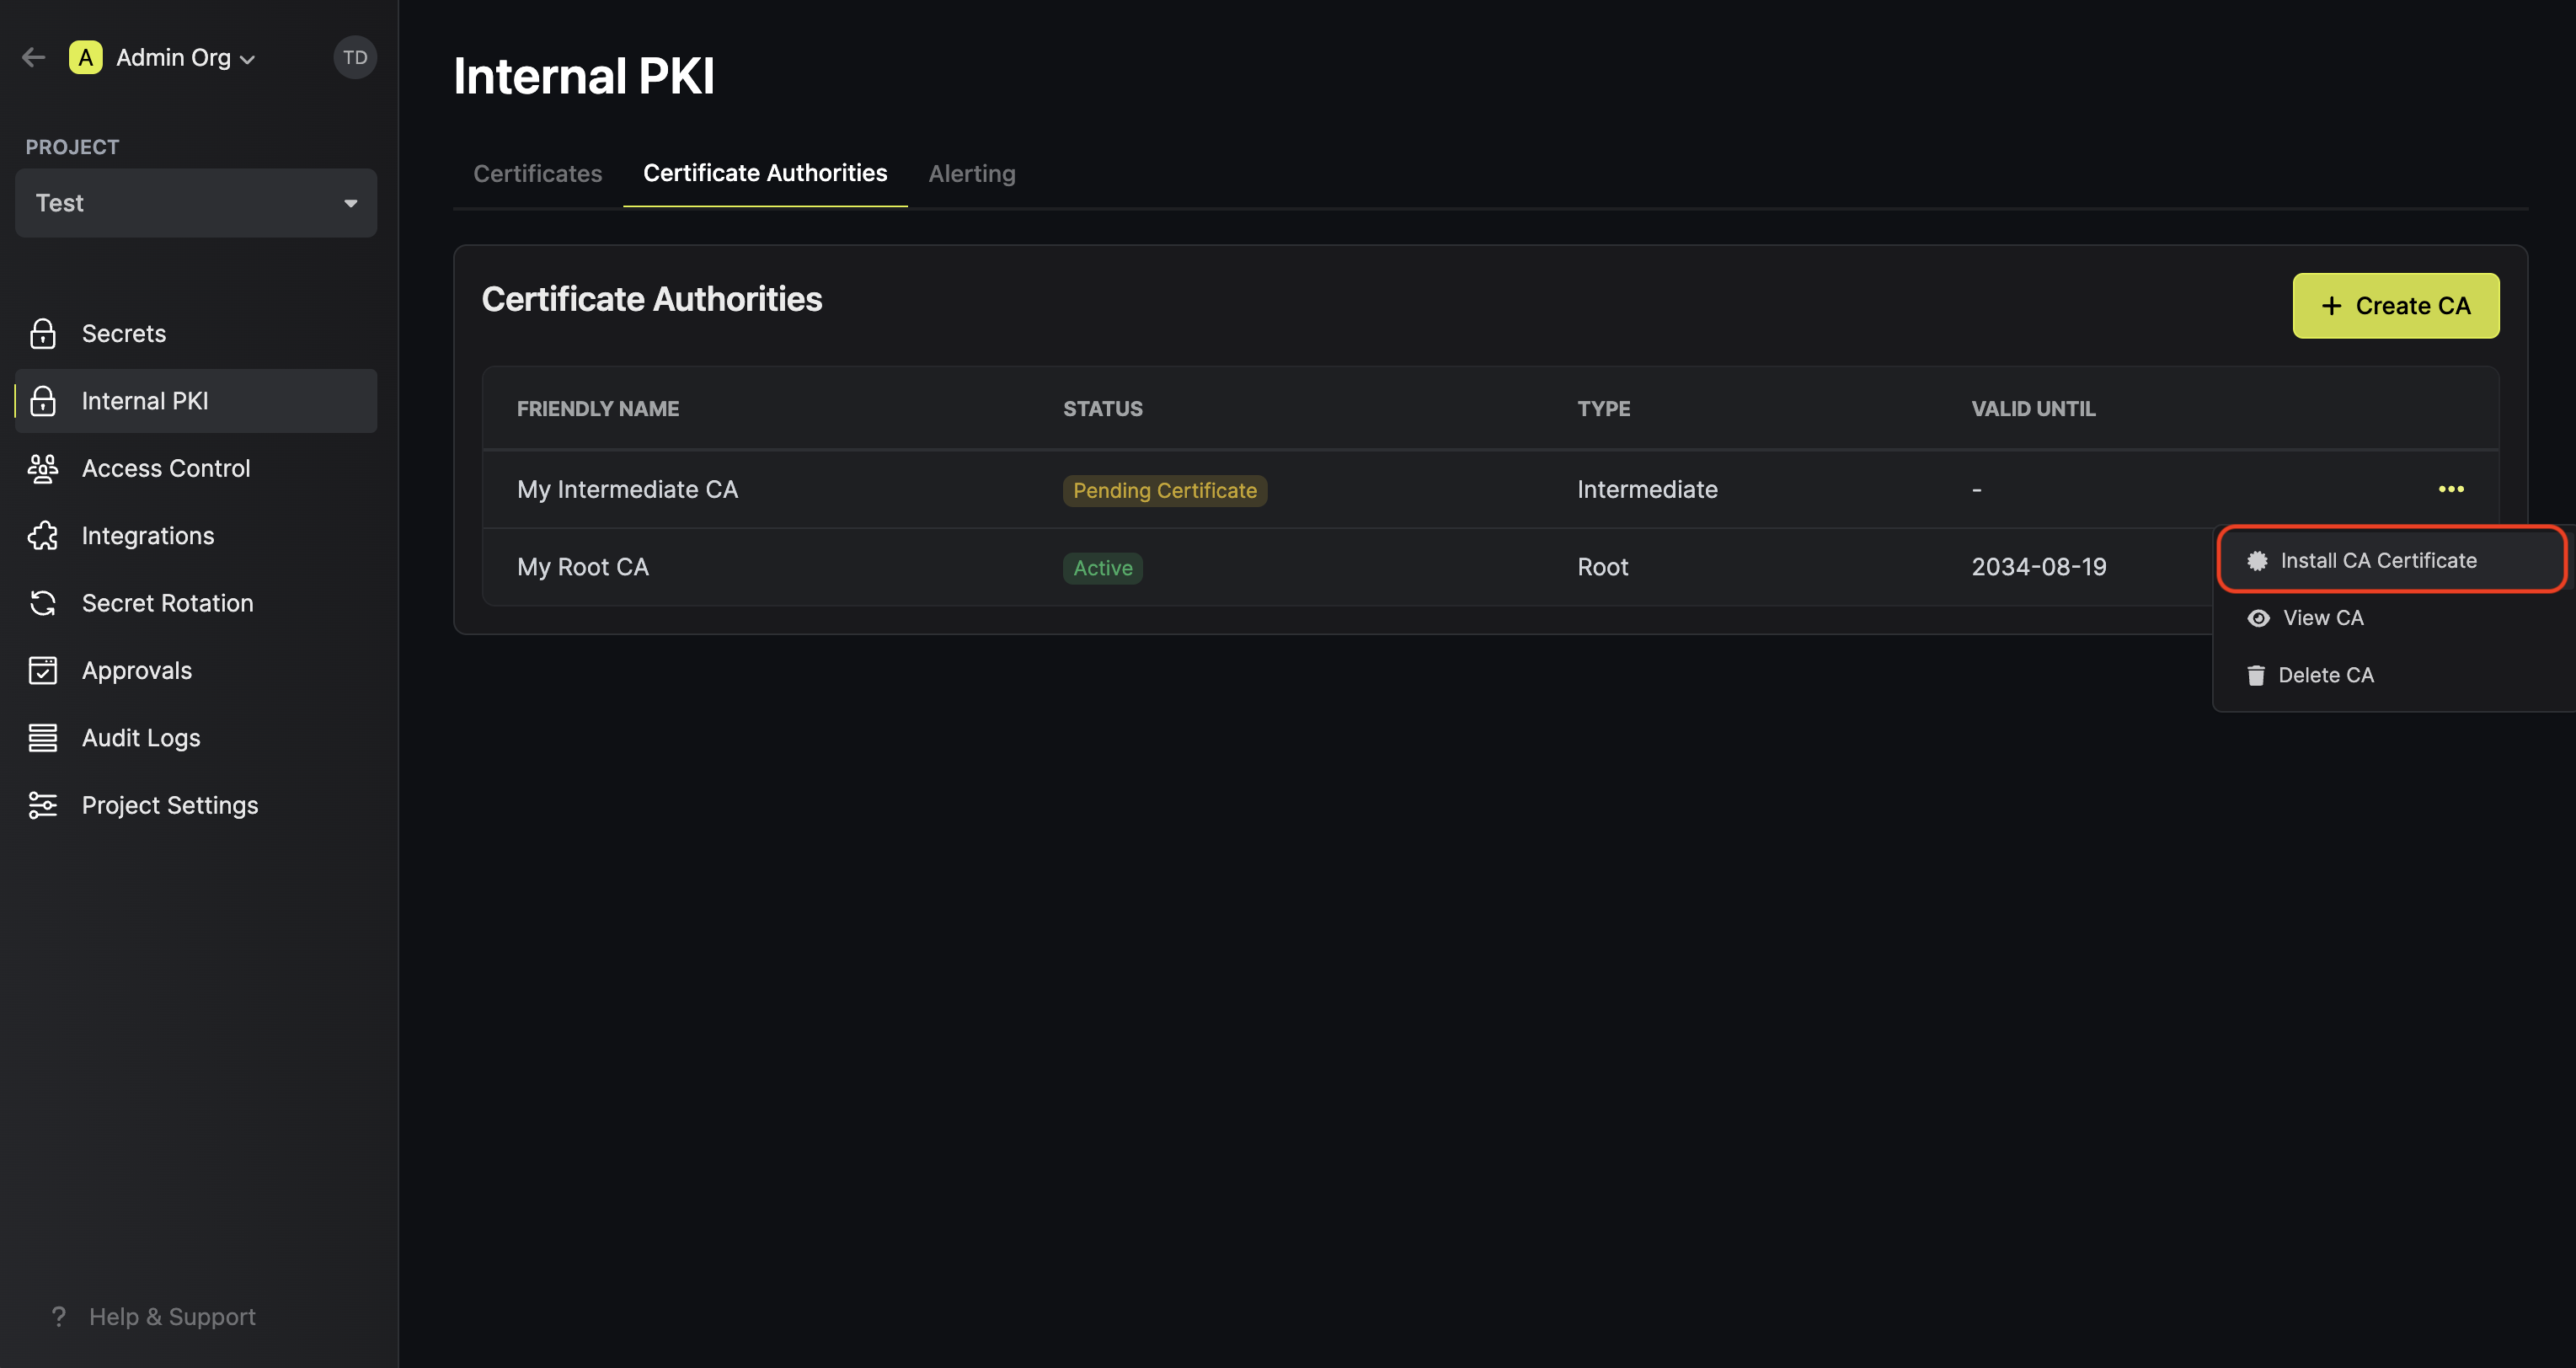
 2.2. Next, press the **Install Certificate** option on the intermediate CA from step 1.1.
 2.3a. If you created a root CA in step 1, select **Encrova CA** for the **Parent CA Type** field.
Next, set the **Parent CA** to the root CA created in step 1 and configure the intended **Valid Until** and **Path Length** fields on the intermediate CA; feel free to use the prefilled values.
2.3a. If you created a root CA in step 1, select **Encrova CA** for the **Parent CA Type** field.
Next, set the **Parent CA** to the root CA created in step 1 and configure the intended **Valid Until** and **Path Length** fields on the intermediate CA; feel free to use the prefilled values.
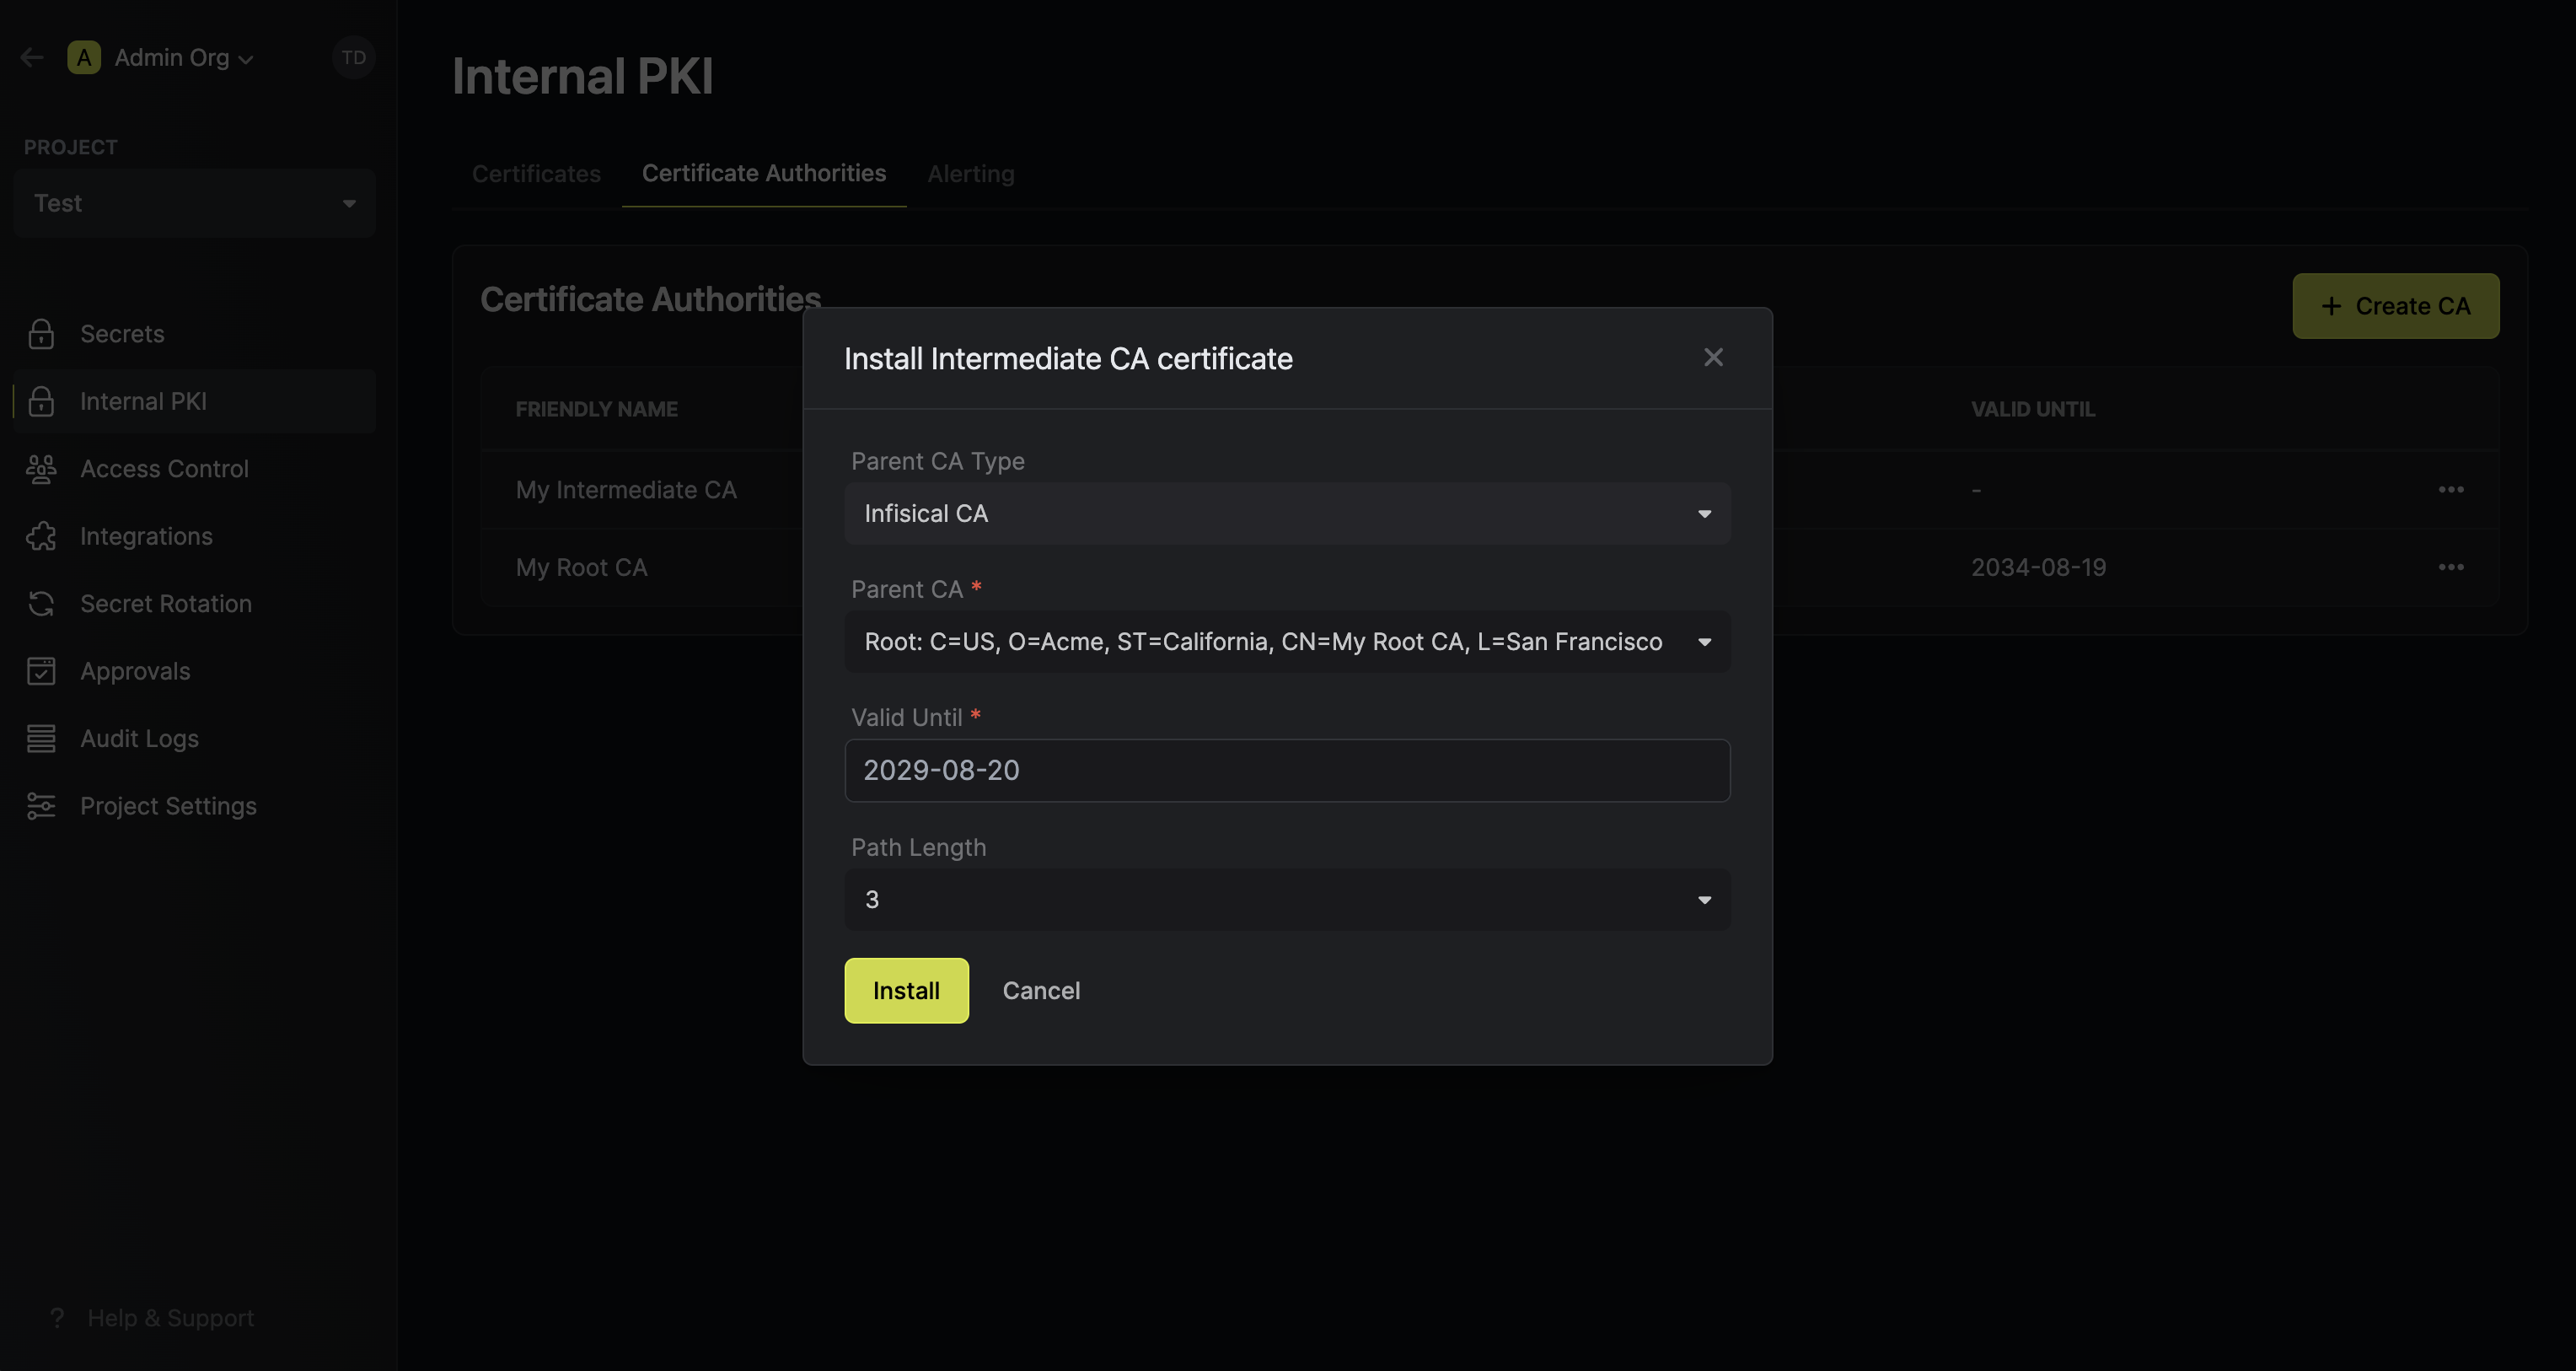 Here's some guidance on each field:
* Parent CA: The parent CA to which this intermediate CA will be chained. In this case, it should be the root CA created in step 1.
* Valid Until: The date until which the CA is valid in the date time string format specified [here](https://developer.mozilla.org/en-US/docs/Web/JavaScript/Reference/Global_Objects/Date#date_time_string_format). The date must be within the validity period of the parent CA.
* Path Length: The maximum number of intermediate CAs that can be chained to this CA. The path length must be less than the path length of the parent CA.
Finally, press **Install** to chain the intermediate CA to the root CA; this creates a Certificate Signing Request (CSR) for the intermediate CA, creates an intermediate certificate using the root CA private key and CSR, and imports the signed certificate back to the intermediate CA.
Here's some guidance on each field:
* Parent CA: The parent CA to which this intermediate CA will be chained. In this case, it should be the root CA created in step 1.
* Valid Until: The date until which the CA is valid in the date time string format specified [here](https://developer.mozilla.org/en-US/docs/Web/JavaScript/Reference/Global_Objects/Date#date_time_string_format). The date must be within the validity period of the parent CA.
* Path Length: The maximum number of intermediate CAs that can be chained to this CA. The path length must be less than the path length of the parent CA.
Finally, press **Install** to chain the intermediate CA to the root CA; this creates a Certificate Signing Request (CSR) for the intermediate CA, creates an intermediate certificate using the root CA private key and CSR, and imports the signed certificate back to the intermediate CA.
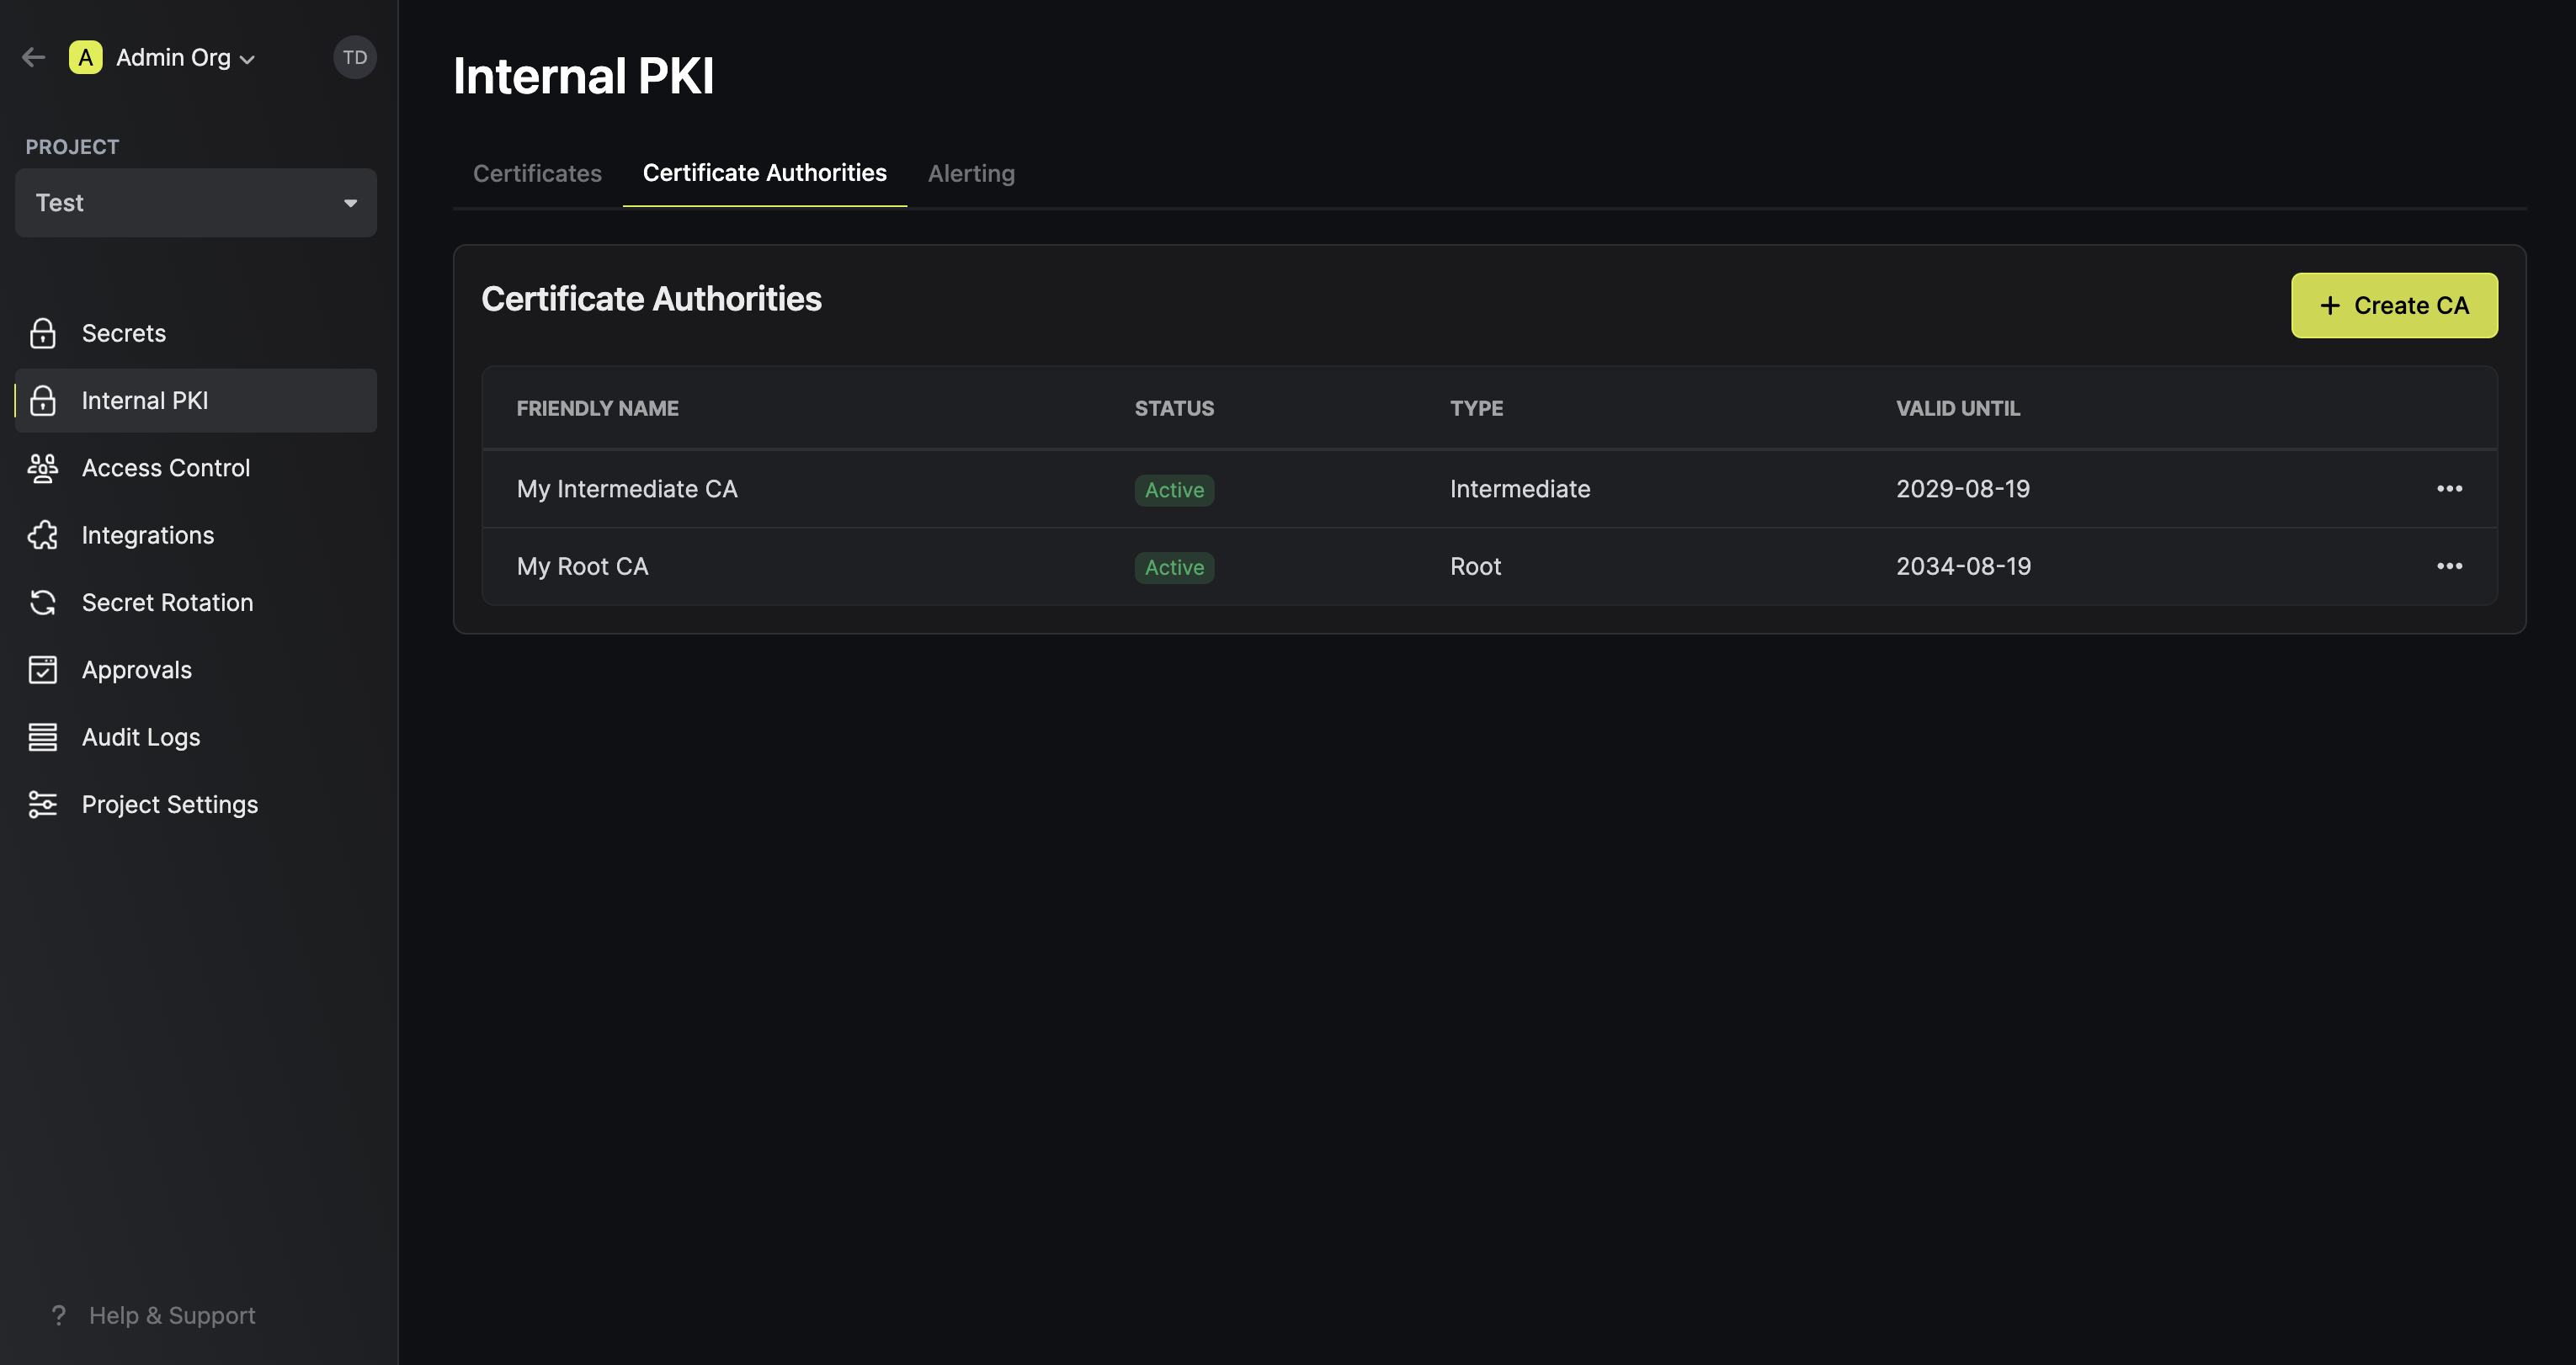 Great! You've successfully created a Private CA hierarchy with a root CA and an intermediate CA.
Now check out the [Certificates](/platform/pki/certificates) page to learn more about how to issue X.509 certificates using the intermediate CA.
2.3b. If you have an external root CA, select **External CA** for the **Parent CA Type** field.
Next, use the provided intermediate CSR to generate a certificate from your external root CA and paste the PEM-encoded certificate back into the **Certificate Body** field; the PEM-encoded external root CA certificate should be pasted under the **Certificate Chain** field.
Great! You've successfully created a Private CA hierarchy with a root CA and an intermediate CA.
Now check out the [Certificates](/platform/pki/certificates) page to learn more about how to issue X.509 certificates using the intermediate CA.
2.3b. If you have an external root CA, select **External CA** for the **Parent CA Type** field.
Next, use the provided intermediate CSR to generate a certificate from your external root CA and paste the PEM-encoded certificate back into the **Certificate Body** field; the PEM-encoded external root CA certificate should be pasted under the **Certificate Chain** field.
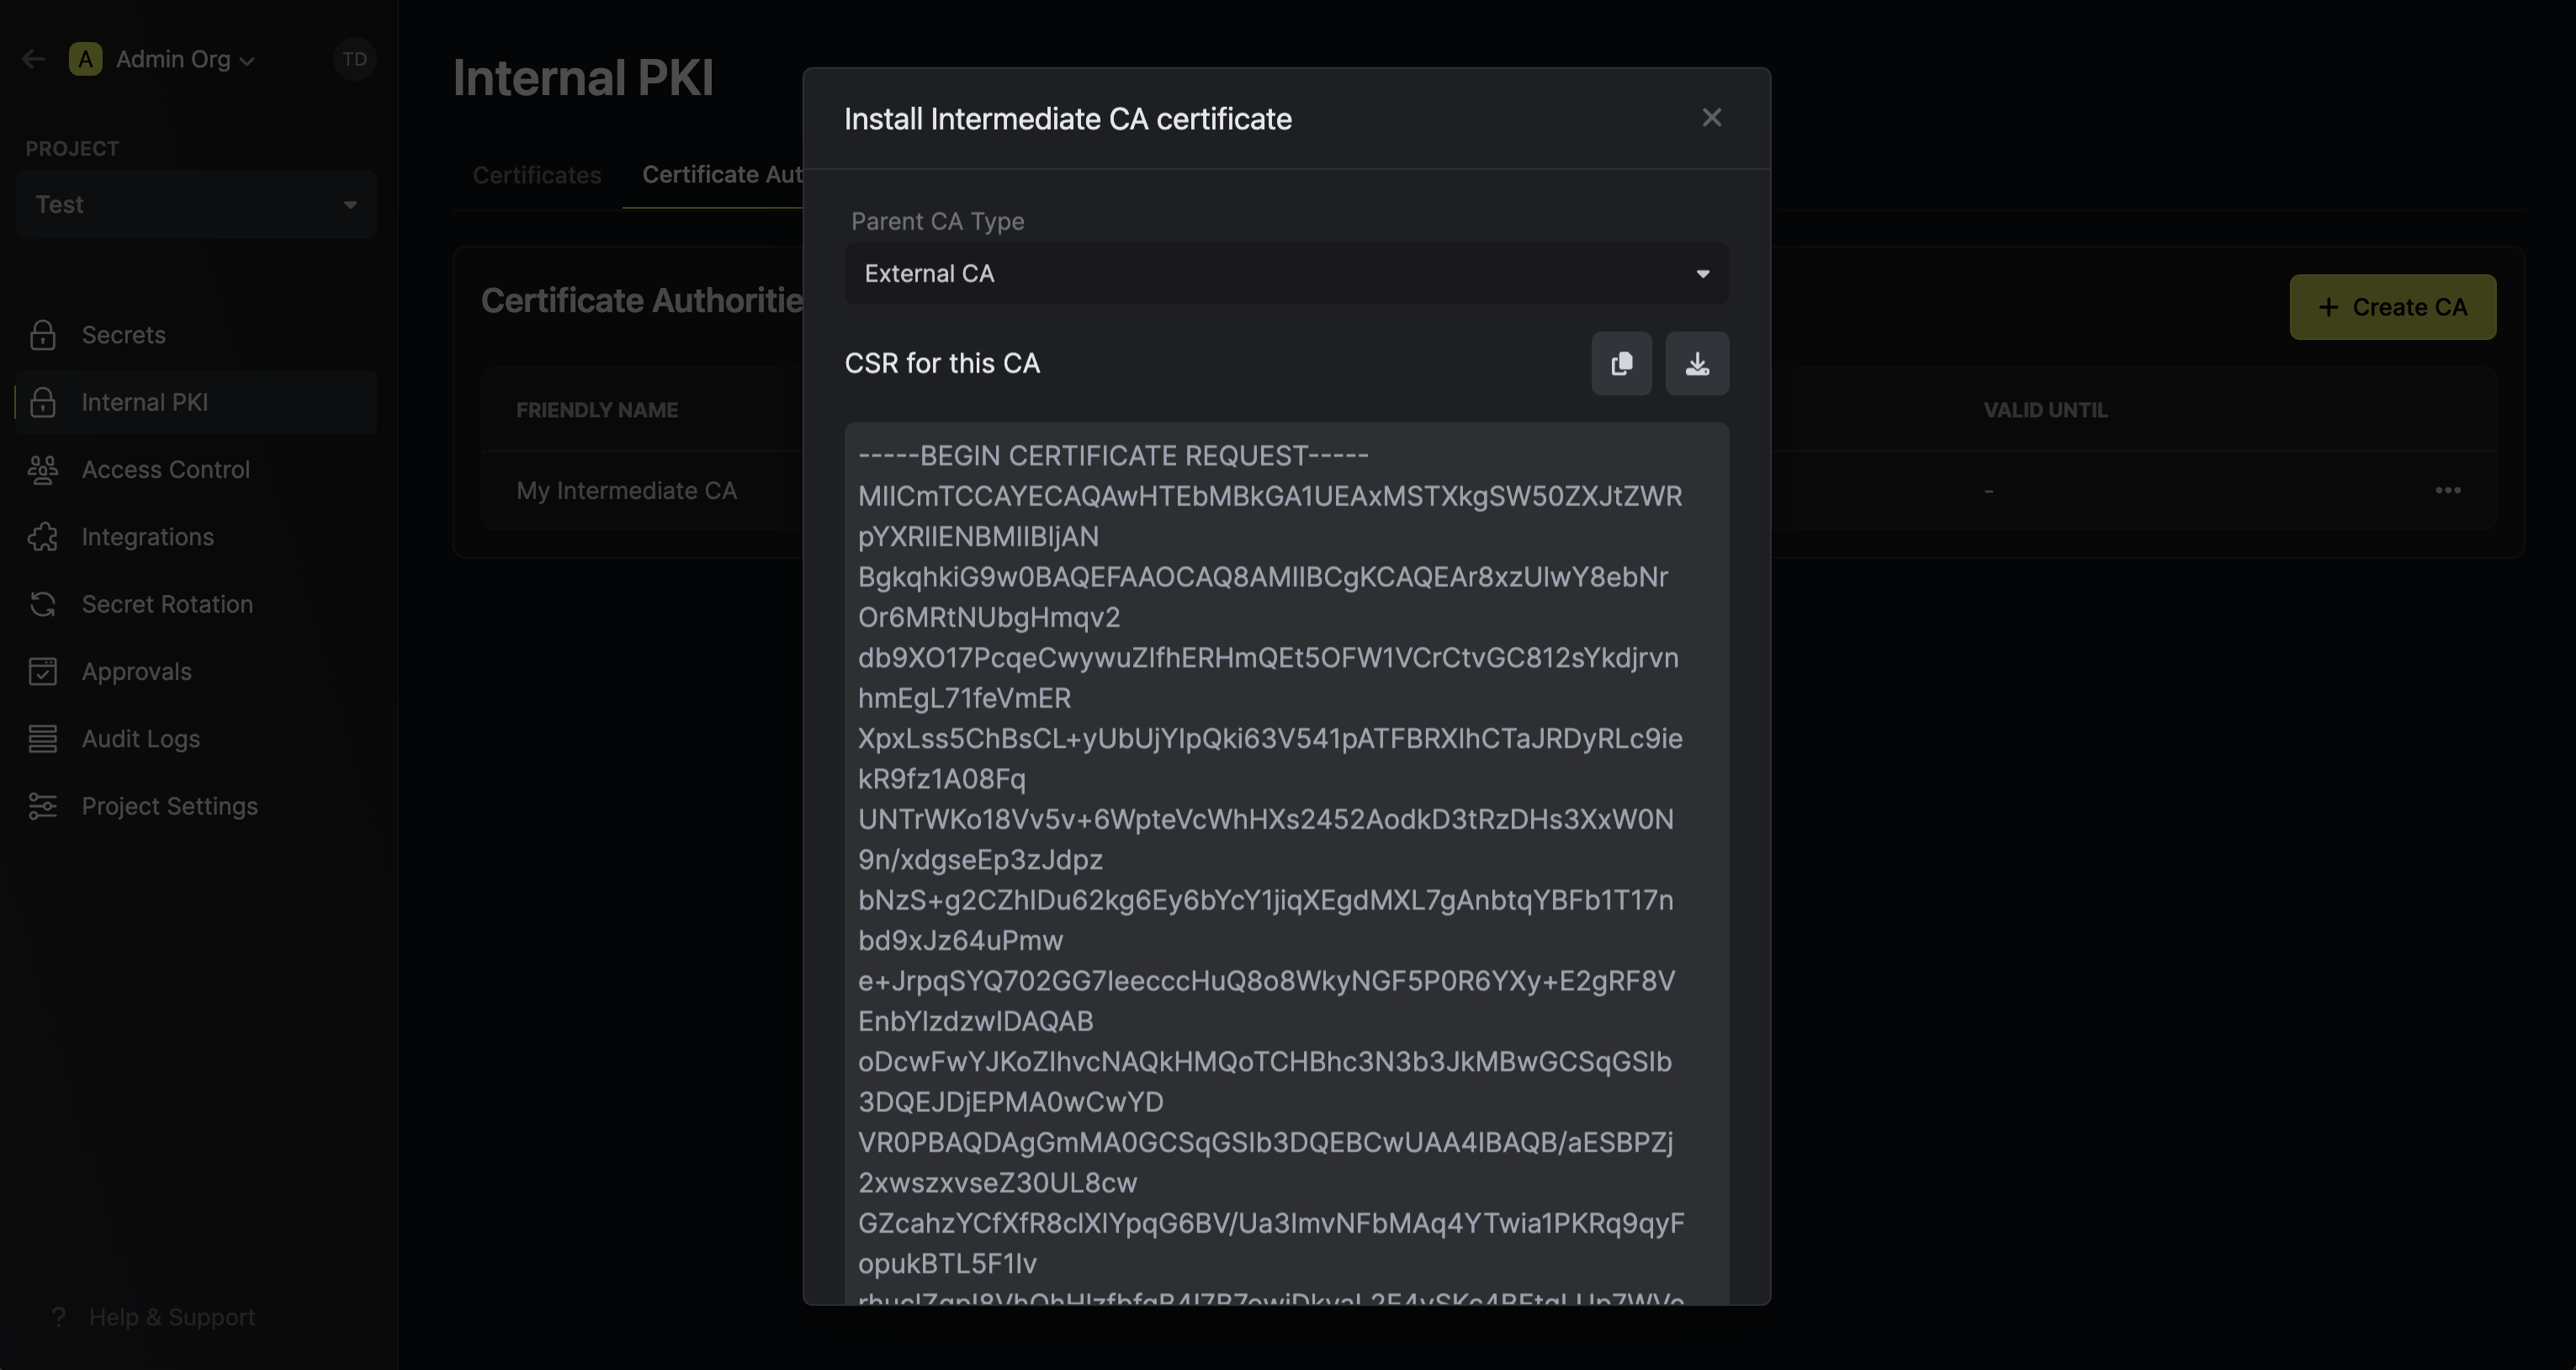 Finally, press **Install** to import the certificate and certificate chain as part of the installation step for the intermediate CA
Great! You've successfully created a Private CA hierarchy with an intermediate CA chained to an external root CA.
Now check out the [Certificates](/platform/pki/certificates) page to learn more about how to issue X.509 certificates using the intermediate CA.
If you wish to use an external root CA, you can skip this step and head to step 2 to create an intermediate CA.
To create a root CA, make an API request to the [Create CA](/api-reference/endpoints/certificate-authorities/create) API endpoint, specifying the `type` as `root`.
### Sample request
```bash Request
curl --location --request POST 'https://secret-manager.t.platform.dev.ai71services.ai/api/v1/pki/ca' \
--header 'Authorization: Bearer ' \
--header 'Content-Type: application/json' \
--data-raw '{
"projectSlug": "",
"type": "root",
"commonName": "My Root CA"
}'
```
### Sample response
```bash Response
{
ca: {
id: "",
type: "root",
commonName: "My Root CA",
...
}
}
```
By default, Encrova creates a root CA with the `RSA_2048` key algorithm, validity period of 10 years, with no restrictions on path length;
you may override these defaults by specifying your own options when making the API request.
2.1. To create an intermediate CA, make an API request to the [Create CA](/api-reference/endpoints/certificate-authorities/create) API endpoint, specifying the `type` as `intermediate`.
### Sample request
```bash Request
curl --location --request POST 'https://secret-manager.t.platform.dev.ai71services.ai/api/v1/pki/ca' \
--header 'Authorization: Bearer ' \
--header 'Content-Type: application/json' \
--data-raw '{
"projectSlug": "",
"type": "intermediate",
"commonName": "My Intermediate CA"
}'
```
### Sample response
```bash Response
{
ca: {
id: "",
type: "intermediate",
commonName: "My Intermediate CA",
...
}
}
```
2.2. Next, get a certificate signing request from the intermediate CA by making an API request to the [Get CSR](/api-reference/endpoints/certificate-authorities/csr) API endpoint.
### Sample request
```bash Request
curl --location --request GET 'https://secret-manager.t.platform.dev.ai71services.ai/api/v1/pki/ca//csr' \
--header 'Authorization: Bearer ' \
--data-raw ''
```
### Sample response
```bash Response
{
csr: "..."
}
```
If using an external root CA, then use the CSR to generate a certificate for the intermediate CA using your external root CA and skip to step 2.4.
2.3. Next, create an intermediate certificate by making an API request to the [Sign Intermediate](/api-reference/endpoints/certificate-authorities/sign-intermediate) API endpoint
containing the CSR from step 2.2, referencing the root CA created in step 1.
### Sample request
```bash Request
curl --location --request POST 'https://secret-manager.t.platform.dev.ai71services.ai/api/v1/pki/ca//sign-intermediate' \
--header 'Content-Type: application/json' \
--data-raw '{
"csr": "",
"notAfter": "2029-06-12"
}'
```
### Sample response
```bash Response
{
certificate: "...",
certificateChain: "...",
issuingCaCertificate: "...",
serialNumber: "...",
}
```
The `notAfter` value must be within the validity period of the root CA that is if the root CA is valid until `2029-06-12`, the intermediate CA must be valid until a date before `2029-06-12`.
2.4. Finally, import the intermediate certificate and certificate chain from step 2.3 back to the intermediate CA by making an API request to the [Import Certificate](/api-reference/endpoints/certificate-authorities/import-cert) API endpoint.
If using an external root CA, then import the generated certificate and root CA certificate under certificate chain back into the intermediate CA.
### Sample request
```bash Request
curl --location --request POST 'https://secret-manager.t.platform.dev.ai71services.ai/api/v1/pki/ca//import-certificate' \
--header 'Authorization: Bearer ' \
--header 'Content-Type: application/json' \
--data-raw '{
"certificate": "",
"certificateChain": ""
}'
```
### Sample response
```bash Response
{
message: "Successfully imported certificate to CA",
caId: "..."
}
```
Great! You’ve successfully created a Private CA hierarchy with a root CA and an intermediate CA. Now check out the Certificates page to learn more about how to issue X.509 certificates using the intermediate CA.
## Guide to CA Renewal
In the following steps, we explore how to renew a CA certificate.
If renewing an intermediate CA chained to an Encrova CA, then Encrova will
automate the process of generating a new certificate for the intermediate CA for you.
If renewing an intermediate CA chained to an external parent CA, you'll be
required to generate a new certificate from the external parent CA and manually import
the certificate back to the intermediate CA.
Head to the CA Page of the CA you wish you renew and press **Renew CA** on
the left side.
Finally, press **Install** to import the certificate and certificate chain as part of the installation step for the intermediate CA
Great! You've successfully created a Private CA hierarchy with an intermediate CA chained to an external root CA.
Now check out the [Certificates](/platform/pki/certificates) page to learn more about how to issue X.509 certificates using the intermediate CA.
If you wish to use an external root CA, you can skip this step and head to step 2 to create an intermediate CA.
To create a root CA, make an API request to the [Create CA](/api-reference/endpoints/certificate-authorities/create) API endpoint, specifying the `type` as `root`.
### Sample request
```bash Request
curl --location --request POST 'https://secret-manager.t.platform.dev.ai71services.ai/api/v1/pki/ca' \
--header 'Authorization: Bearer ' \
--header 'Content-Type: application/json' \
--data-raw '{
"projectSlug": "",
"type": "root",
"commonName": "My Root CA"
}'
```
### Sample response
```bash Response
{
ca: {
id: "",
type: "root",
commonName: "My Root CA",
...
}
}
```
By default, Encrova creates a root CA with the `RSA_2048` key algorithm, validity period of 10 years, with no restrictions on path length;
you may override these defaults by specifying your own options when making the API request.
2.1. To create an intermediate CA, make an API request to the [Create CA](/api-reference/endpoints/certificate-authorities/create) API endpoint, specifying the `type` as `intermediate`.
### Sample request
```bash Request
curl --location --request POST 'https://secret-manager.t.platform.dev.ai71services.ai/api/v1/pki/ca' \
--header 'Authorization: Bearer ' \
--header 'Content-Type: application/json' \
--data-raw '{
"projectSlug": "",
"type": "intermediate",
"commonName": "My Intermediate CA"
}'
```
### Sample response
```bash Response
{
ca: {
id: "",
type: "intermediate",
commonName: "My Intermediate CA",
...
}
}
```
2.2. Next, get a certificate signing request from the intermediate CA by making an API request to the [Get CSR](/api-reference/endpoints/certificate-authorities/csr) API endpoint.
### Sample request
```bash Request
curl --location --request GET 'https://secret-manager.t.platform.dev.ai71services.ai/api/v1/pki/ca//csr' \
--header 'Authorization: Bearer ' \
--data-raw ''
```
### Sample response
```bash Response
{
csr: "..."
}
```
If using an external root CA, then use the CSR to generate a certificate for the intermediate CA using your external root CA and skip to step 2.4.
2.3. Next, create an intermediate certificate by making an API request to the [Sign Intermediate](/api-reference/endpoints/certificate-authorities/sign-intermediate) API endpoint
containing the CSR from step 2.2, referencing the root CA created in step 1.
### Sample request
```bash Request
curl --location --request POST 'https://secret-manager.t.platform.dev.ai71services.ai/api/v1/pki/ca//sign-intermediate' \
--header 'Content-Type: application/json' \
--data-raw '{
"csr": "",
"notAfter": "2029-06-12"
}'
```
### Sample response
```bash Response
{
certificate: "...",
certificateChain: "...",
issuingCaCertificate: "...",
serialNumber: "...",
}
```
The `notAfter` value must be within the validity period of the root CA that is if the root CA is valid until `2029-06-12`, the intermediate CA must be valid until a date before `2029-06-12`.
2.4. Finally, import the intermediate certificate and certificate chain from step 2.3 back to the intermediate CA by making an API request to the [Import Certificate](/api-reference/endpoints/certificate-authorities/import-cert) API endpoint.
If using an external root CA, then import the generated certificate and root CA certificate under certificate chain back into the intermediate CA.
### Sample request
```bash Request
curl --location --request POST 'https://secret-manager.t.platform.dev.ai71services.ai/api/v1/pki/ca//import-certificate' \
--header 'Authorization: Bearer ' \
--header 'Content-Type: application/json' \
--data-raw '{
"certificate": "",
"certificateChain": ""
}'
```
### Sample response
```bash Response
{
message: "Successfully imported certificate to CA",
caId: "..."
}
```
Great! You’ve successfully created a Private CA hierarchy with a root CA and an intermediate CA. Now check out the Certificates page to learn more about how to issue X.509 certificates using the intermediate CA.
## Guide to CA Renewal
In the following steps, we explore how to renew a CA certificate.
If renewing an intermediate CA chained to an Encrova CA, then Encrova will
automate the process of generating a new certificate for the intermediate CA for you.
If renewing an intermediate CA chained to an external parent CA, you'll be
required to generate a new certificate from the external parent CA and manually import
the certificate back to the intermediate CA.
Head to the CA Page of the CA you wish you renew and press **Renew CA** on
the left side.
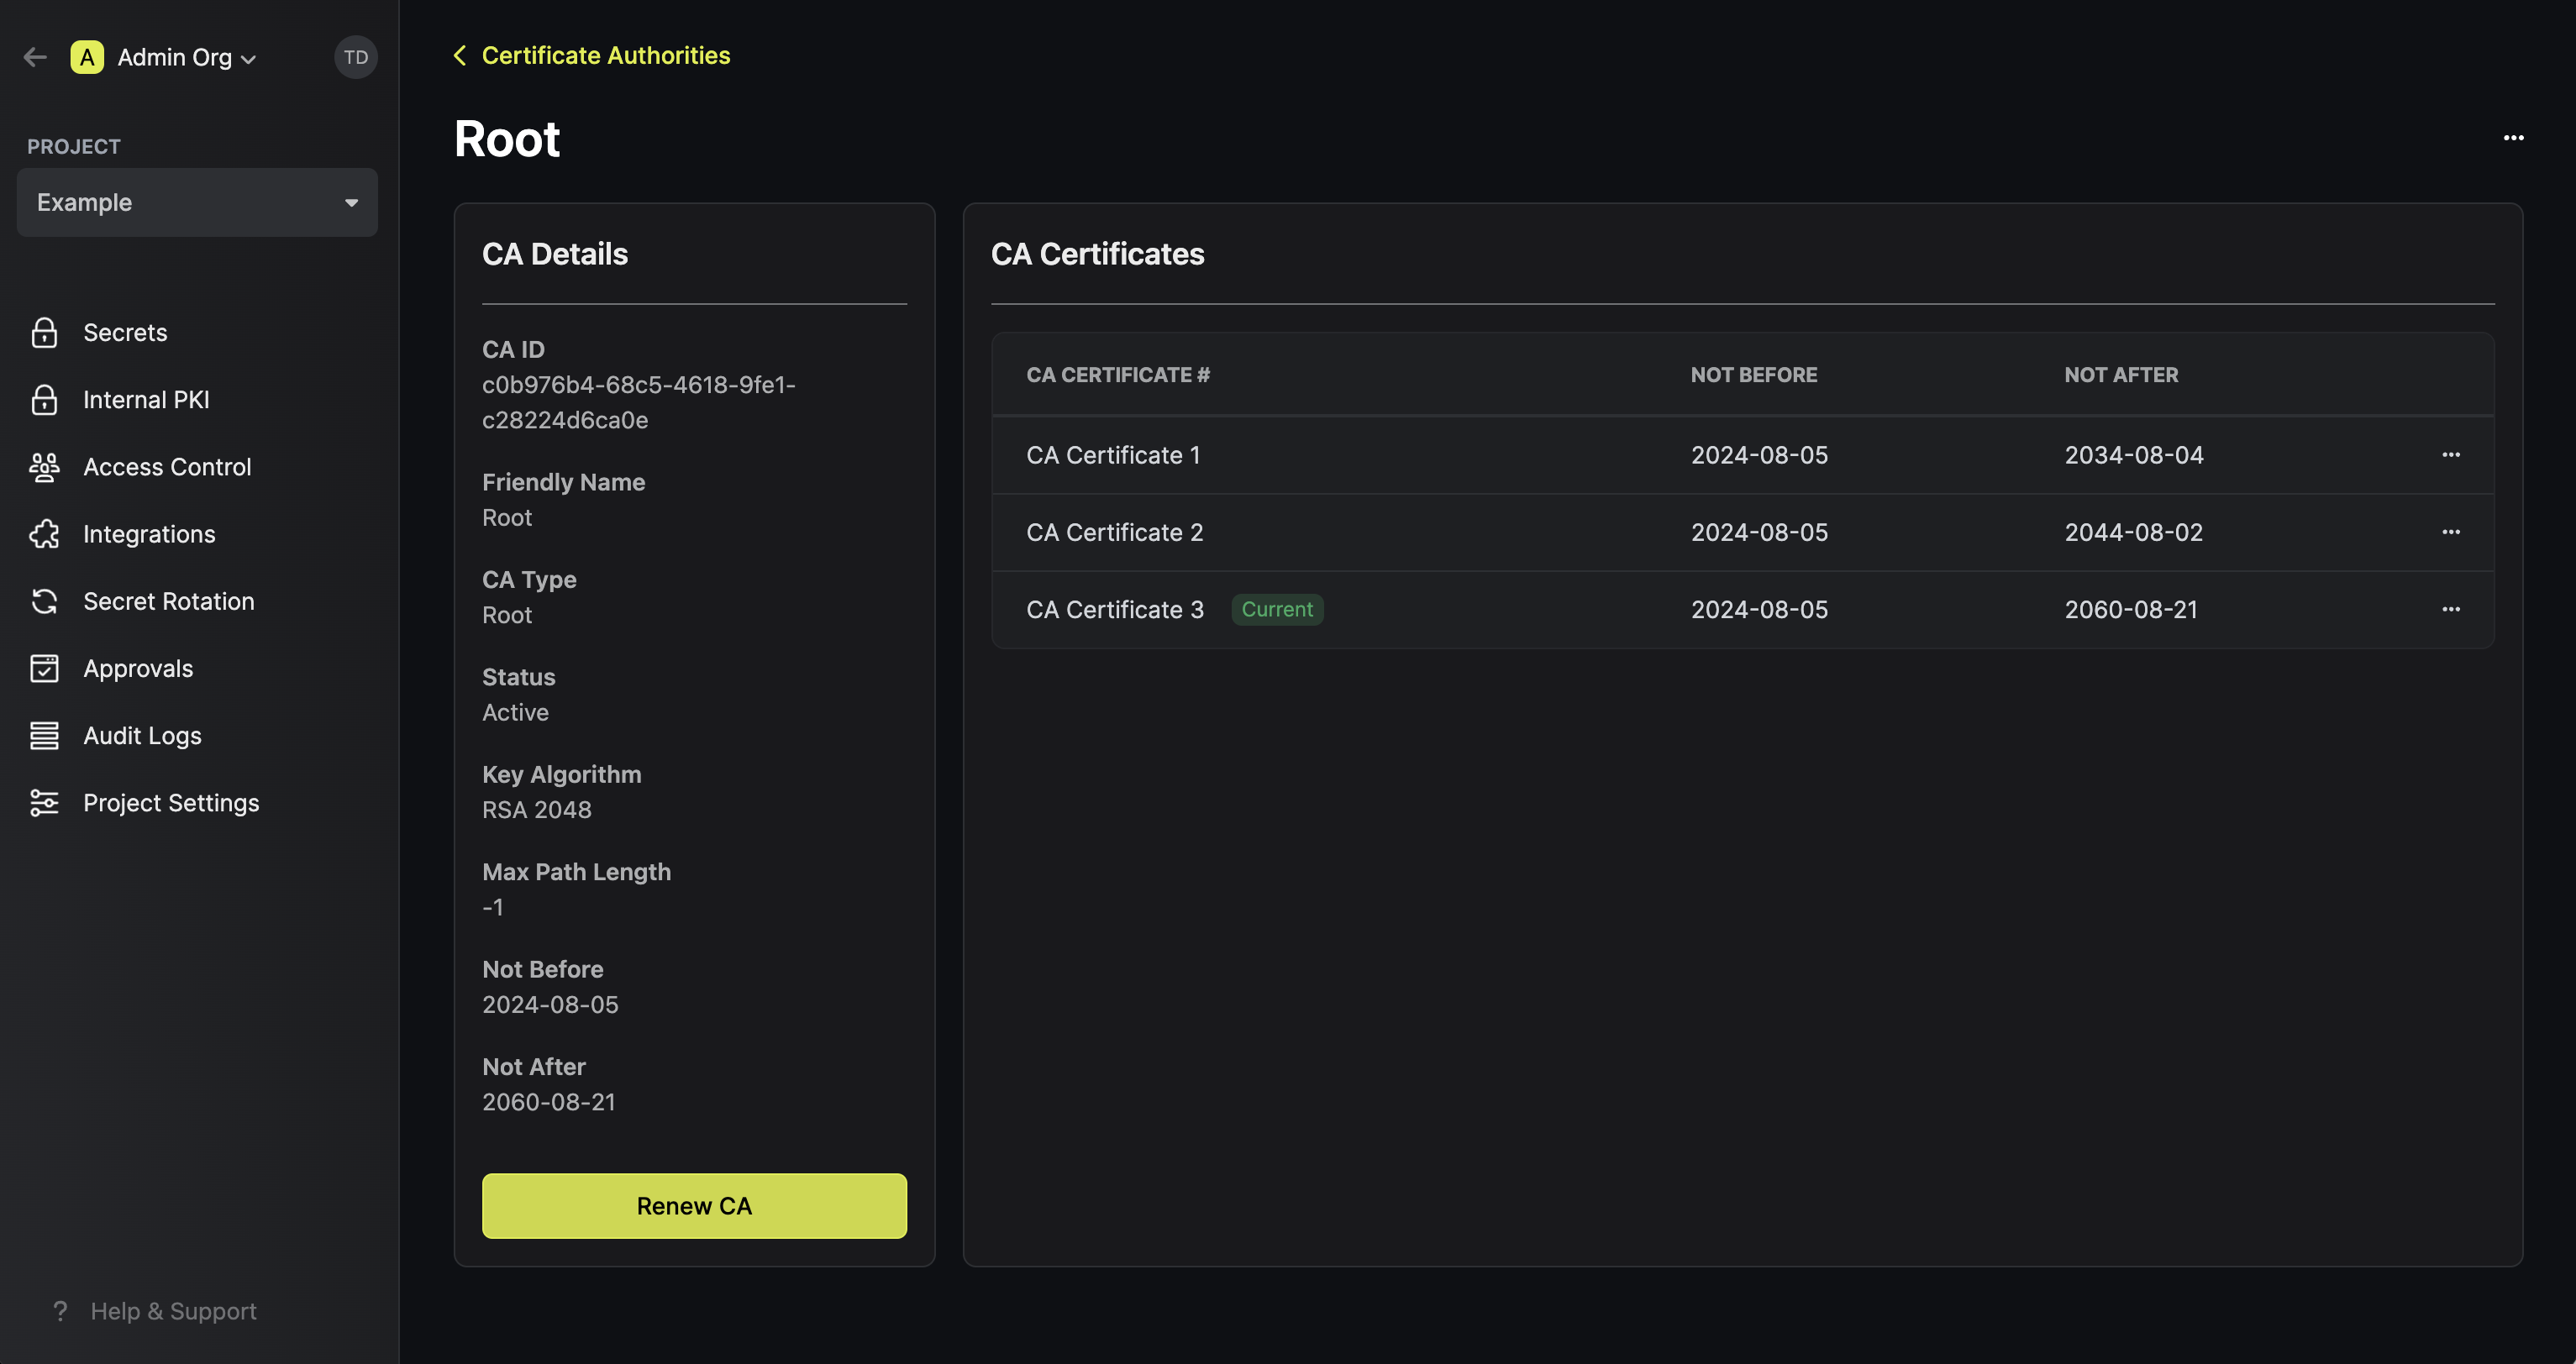 Input a new **Valid Until** date to be used for the renewed CA certificate and press **Renew** to renew
the CA.
Input a new **Valid Until** date to be used for the renewed CA certificate and press **Renew** to renew
the CA.
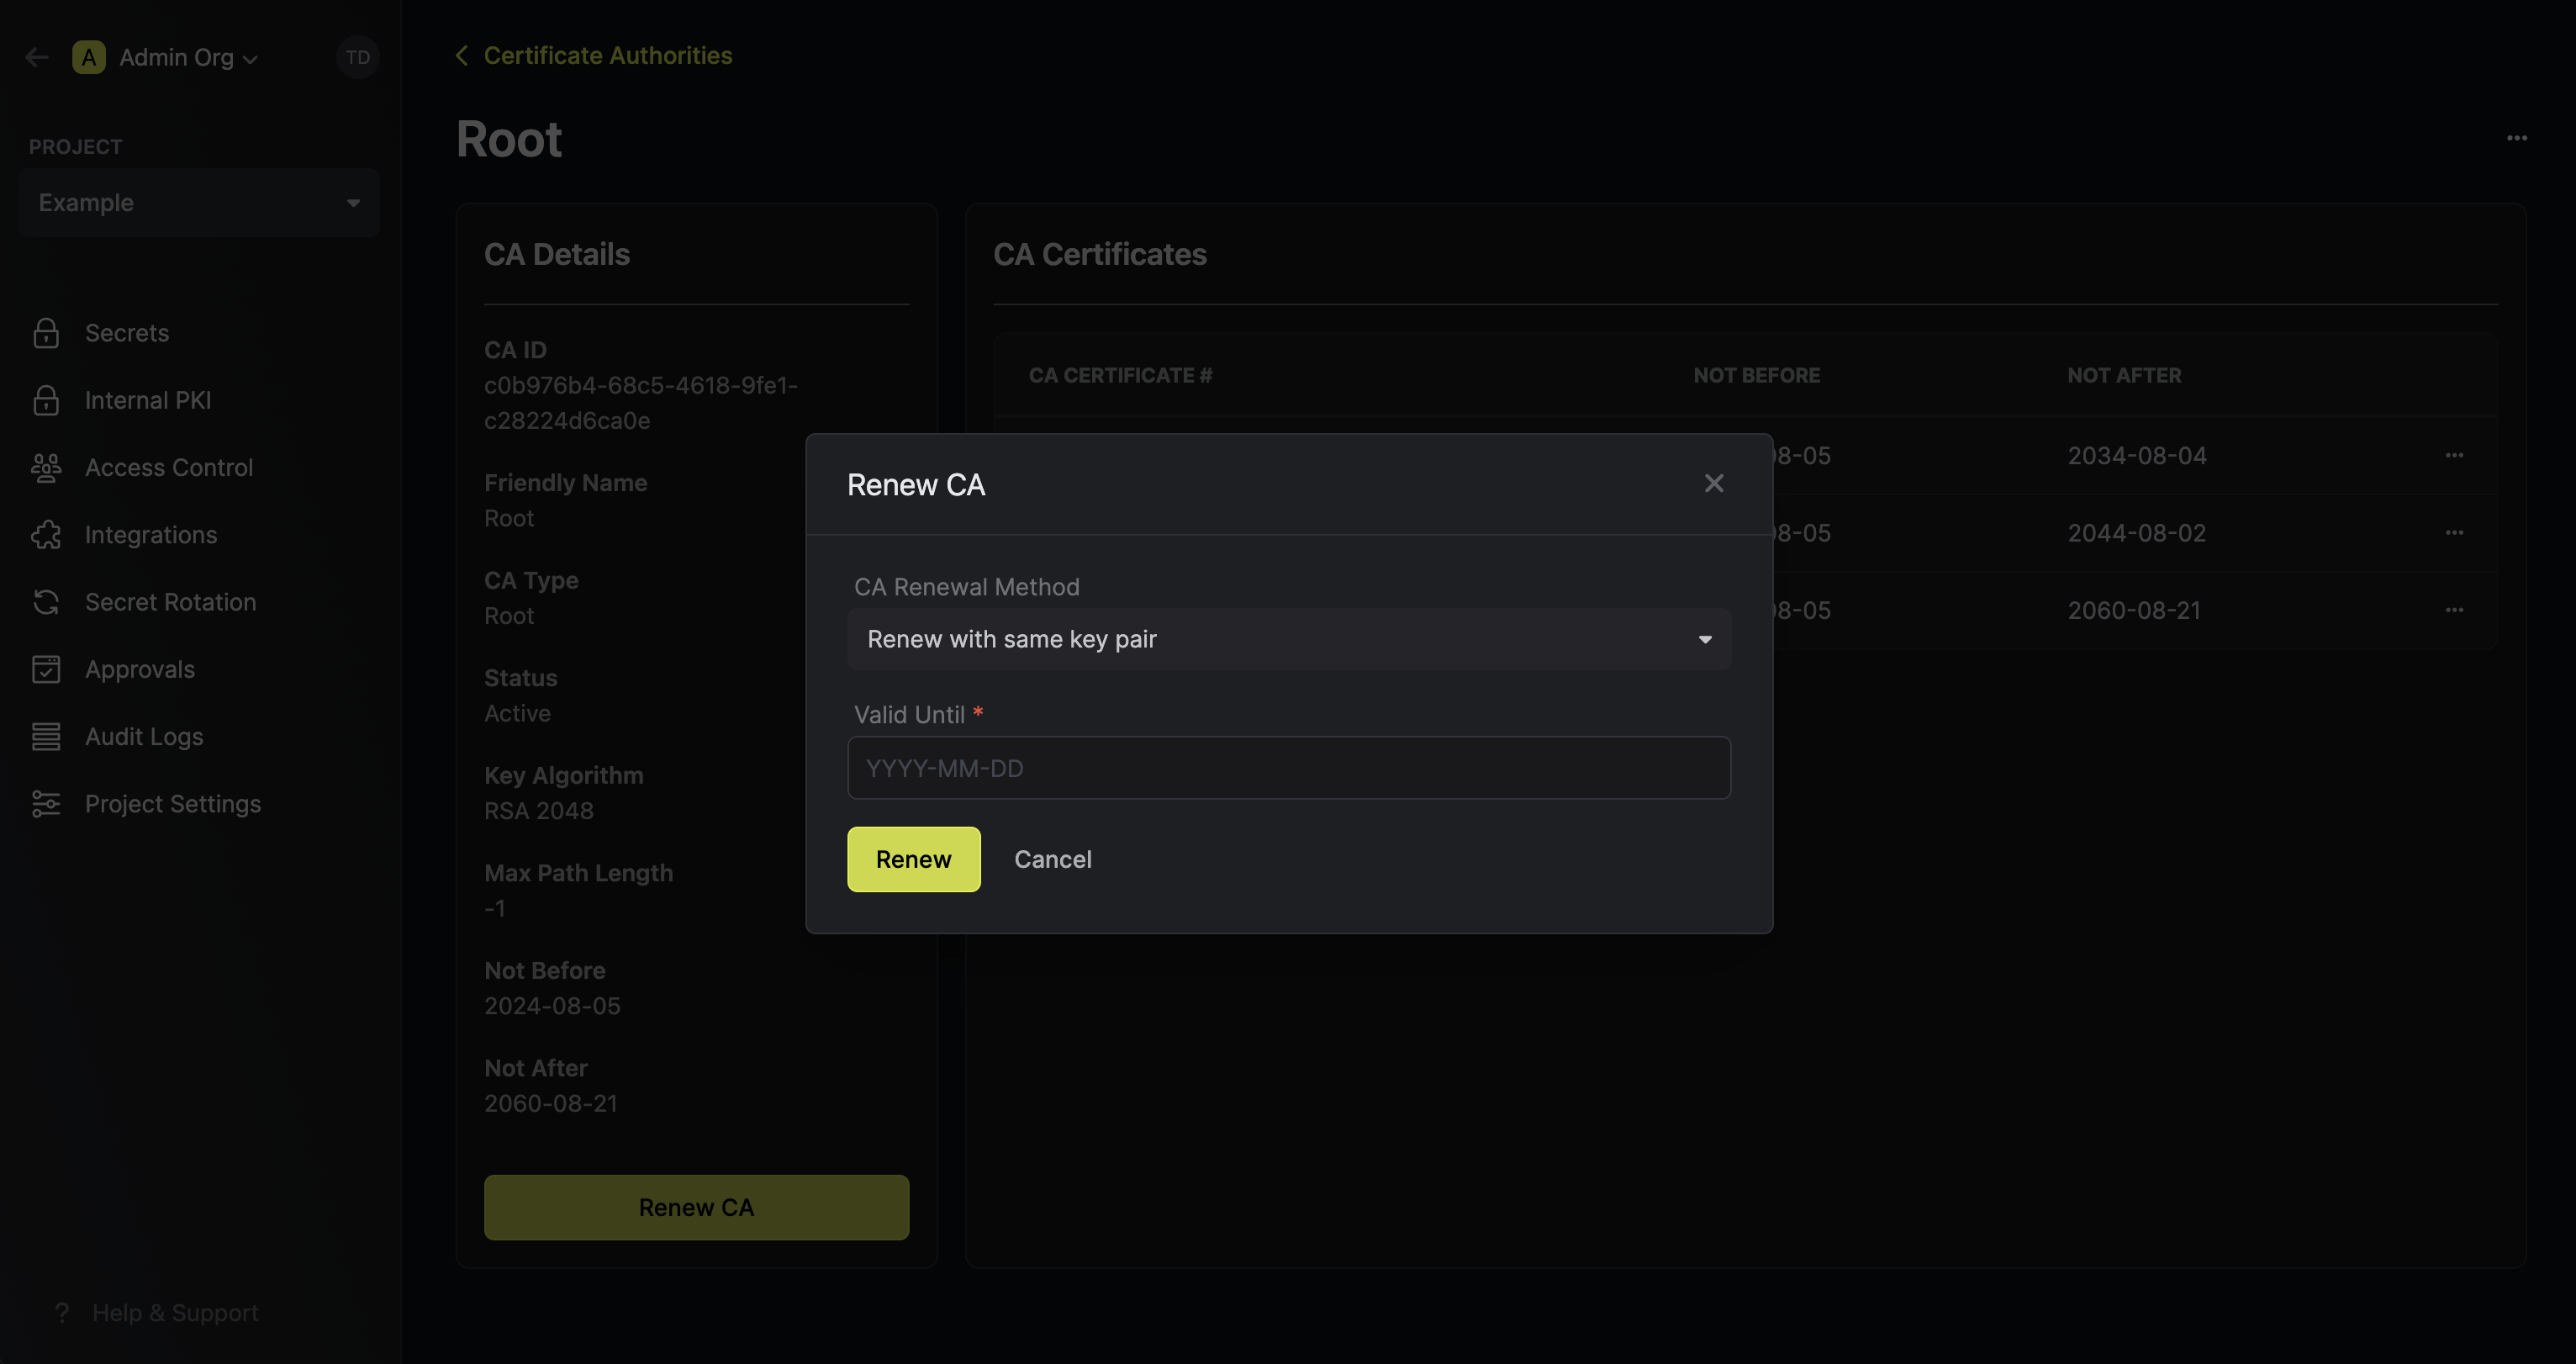 The new **Valid Until** date must be within the validity period of the
parent CA.
To renew a CA certificate, make an API request to the [Renew CA](/api-reference/endpoints/certificate-authorities/renew) API endpoint, specifying the new `notAfter` date for the CA.
### Sample request
```bash Request
curl --location --request POST 'https://secret-manager.t.platform.dev.ai71services.ai/api/v1/pki/ca//renew' \
--header 'Authorization: Bearer ' \
--header 'Content-Type: application/json' \
--data-raw '{
"type": "existing",
"notAfter": "2029-06-12"
}'
```
### Sample response
```bash Response
{
certificate: "...",
certificateChain: "...",
serialNumber: "..."
}
```
## FAQ
Encrova supports `RSA 2048`, `RSA 4096`, `ECDSA P-256`, `ECDSA P-384` key
algorithms specified at the time of creating a CA.
At the moment, Encrova only supports CA renewal via same key pair. We
anticipate supporting CA renewal via new key pair in the coming month.
Yes. You may obtain a CSR from the Intermediate CA and use it to generate a
certificate from your external CA. The certificate, along with the external
CA certificate chain, can be imported back to the Intermediate CA as part of
the CA installation step.
The new **Valid Until** date must be within the validity period of the
parent CA.
To renew a CA certificate, make an API request to the [Renew CA](/api-reference/endpoints/certificate-authorities/renew) API endpoint, specifying the new `notAfter` date for the CA.
### Sample request
```bash Request
curl --location --request POST 'https://secret-manager.t.platform.dev.ai71services.ai/api/v1/pki/ca//renew' \
--header 'Authorization: Bearer ' \
--header 'Content-Type: application/json' \
--data-raw '{
"type": "existing",
"notAfter": "2029-06-12"
}'
```
### Sample response
```bash Response
{
certificate: "...",
certificateChain: "...",
serialNumber: "..."
}
```
## FAQ
Encrova supports `RSA 2048`, `RSA 4096`, `ECDSA P-256`, `ECDSA P-384` key
algorithms specified at the time of creating a CA.
At the moment, Encrova only supports CA renewal via same key pair. We
anticipate supporting CA renewal via new key pair in the coming month.
Yes. You may obtain a CSR from the Intermediate CA and use it to generate a
certificate from your external CA. The certificate, along with the external
CA certificate chain, can be imported back to the Intermediate CA as part of
the CA installation step.